skip to main |
skip to sidebar
Green and healthy
Source: Adapted from a Costco recipe by chef Phil Joy
Taste: 5 (out of 5)
Difficulty: 1 (out of 5)
Ingredients:
- 1 kg / 2.2 lbs of Brussels sprouts
- 1/4 cup olive oil
- 1 tsp sea salt
- 1/2 tsp black pepper
- juice of 1 lemon (optional)
- 2 medium tomatoes (optional)
Total: 8 servings
Directions:
1. Wash the Brussels sprouts, cut off the root ends and make a small cut through the middle of the root to allow for even heating.
2. Place the Brussels sprouts in a large bowl, drizzle with olive oil, sprinkle with salt and pepper and mix well.
3. Line a large baking sheet with parchment paper, pour the Brussels sprouts and bake at 400F for 35-40 minutes.
4. If you wish to add the tomatoes and / or the lemon juice, skin and seed the tomatoes, and chop into 1/4 inch cubes. 10 minutes before the Brussels sprouts are done, take the baking sheet out of the oven, toss the Brussels sprouts, add the tomatoes and drizzle with lemon juice, and return to the oven for another 10 minutes.
Afterthoughts:
- Really nice recipe, it takes a little time to cut the roots of all the small Brussels sprouts, but you can treat it as your zen meditation of the day.
- Don't use Hawaiian sea salt, it turns out really salty, maybe because of the large grains. Use finer salt for this recipe.
- One more option is sprinkling with grated cheese and placing under the broiler for another 2 minutes.
To Recipe...
Summary only...
Simple and simply delicious
Source: improvised
Taste: 5 (out of 5)
Difficulty: 1 (out of 5)
Ingredients:
- 3 cups red lentils
- 6 cups / 1 1/2 l water
- 3 inches of ginger (or 3 frozen ginger cubes)
- 1 large potato
- 1 large carrot
- 1 tbsp onion flakes
- 3 cloves garlic
- 2 tomatoes
- 1 tsp cumin
- 1 tsp turmeric
- 1 tbsp salt
- 1/2 tbsp black pepper
- 1 cup chopped parsley or cilantro
- juice of 1 lime
Total: 8 servings
Directions:
1. Wash the carrot, the potato, the ginger and the tomato (no need to peel). Peel the garlic cloves. Place the vegetables with the onion flakes into your Vitamix(or another blender), add 1 cup of water and process on High setting for about 15 seconds until the ingredients are finely ground.
2. In a large pot add the vegetable mix to the remaining water and the lentils and bring to boil on high heat. Stir.
3. When the soup boils, add salt, pepper, cumin and turmeric, reduce heat to medium low and cook for another 30 minutes, stirring every 5 minutes.
4. Right before serving, add chopped cilantro and juice of 1 lime.
Afterthoughts:
Great soup, I make it all the time. If you want, make it thicker and serve as dahl over rice. Can also use fresh onion or tomato paste.
To Recipe...
Summary only...
A drink that keeps the cold away
Source: My mom told me it's good for you
Taste: 1 (out of 5) - you're drinking it for health benefits
Difficulty: 1 (out of 5)
Source:
- 1/2 gallon / 2 liters water
- 3 inches fresh ginger ground, or 3 frozen ginger cubes
- 1 lemon or lime cut in half
Total: 16 servings of 1/2 cup
Directions:
1. Add all ingredients to a large pot, bring to boil, remove from heat and allow to cool. Pour into clean jars and refrigerate.
2. Warm up (e.g. in a microwave) 1/2 cup and drink first thing in the morning before eating anything else.
Afterthoughts:
I really don't like the taste, but I believe this drink is great for preventing colds, and generally strengthening the immune system and cleansing the body. I tried something similar with horseradish several years back, and it kept me healthy all winter. As much as I don't like this ginger drink it tastes much better than the horseradish. I'll wait and see if it's as effective.
To Recipe...
Summary only...
Ready, peeled, ground and portioned ginger whenever you need it
Source: improvised

Taste: Not applicable
Difficulty: 1 (out of 5)
Ingredients:
Ginger root, as much as you want
Directions:
1. Wash and peel the ginger root, and cut into 1/2 inch slices.
2. Place the ginger into your Vitamix (or another very strong) blender. Start on low setting, increase speed from 0 to 5, use the tamper if large chunks of ginger get stuck. When the mixture is more or less uniform, increase the speed to 10, then set it to High and let process for another 15 seconds.
3. Line a small shallow freezer-safe dish (I use a plastic cover of a Pyrex) with parchment paper, and scoop out the ground ginger onto the dish. Flatten the ginger puree with a spatula, and freeze for about 2 hours.
4. Remove the ginger from the freezer, flip the ginger onto a cutting board, peel off the paper, and cut the ginger into squares. Place the squares into a freezer bag and freezer until required.
Afterthoughts:
I love this method and use it with lots of herbs and spices: lemongrass, roasted garlic, parsley, basil, you name it. It is particularly great for highly perishable herbs. For ginger, it saves you a lot of time: you do all the peeling, the grinding and the washing once every couple of months, and have freshly ground ginger whenever you need it in a second.
To Recipe...
Summary only...
Delicious Asian dinner in about half an hour
Source: Salu-salo
Taste: 5 (out of 5)
Difficulty: 1 (out of 5)
Ingredients:
- 1/2 lb ground turkey
- 1 tbsp soy sauce
- 1 1/2 lbs eggplant or Chinese eggplant 1 ½ lbs. Chinese eggplants, ends trimmed and cut on the diagonal into ½-inch slices
- 3 tbsp canola oil
- 8 garlic cloves, thinly sliced
- 2 tbsp cornstarch dissolved in 1 tbsp water
For the sauce:
- 1 cup chicken stock (or 1 cup of chicken flavored Better than Bullion dissolved in 1 cup of hot water)
- 1/4 cup hoisin sauce
- 3 tbsp soy sauce
- 2 tbsp balsamic vinegar
- 1 tsp of sambal oelek or sriracha (or up to 2 tbsp for a spicy version)
- 1 tsp sesame oil
Total: 6 servings
Directions:
1. Trim the eggplants and cut into 1/2 inch slices.
2. Combine the turkey with soy sauce and let stand for 10 minutes.
3. In another bowl, combine all sauce ingredients. Set aside.
4. Heat oil in a large skillet over high heat. Add garlic and cook for 10 to 15 seconds.
5. Add the turkey and cook for 2 minutes, stirring frequently.
6. Add the eggplants and the sauce and stir to mix well. Reduced the heat to medium, cover for about 10 minutes or until eggplants are tender.
7. Add cornstarch solution and cook, stirring until sauce thickens. Serve with steamed rice or cauliflower rice.
Afterthoughts:
This is a really delicious simple recipe and it works with any kind of meat: pork, beef, chicken, turkey. Might even work with ground tofu?! ;-)
To Recipe...
Summary only...
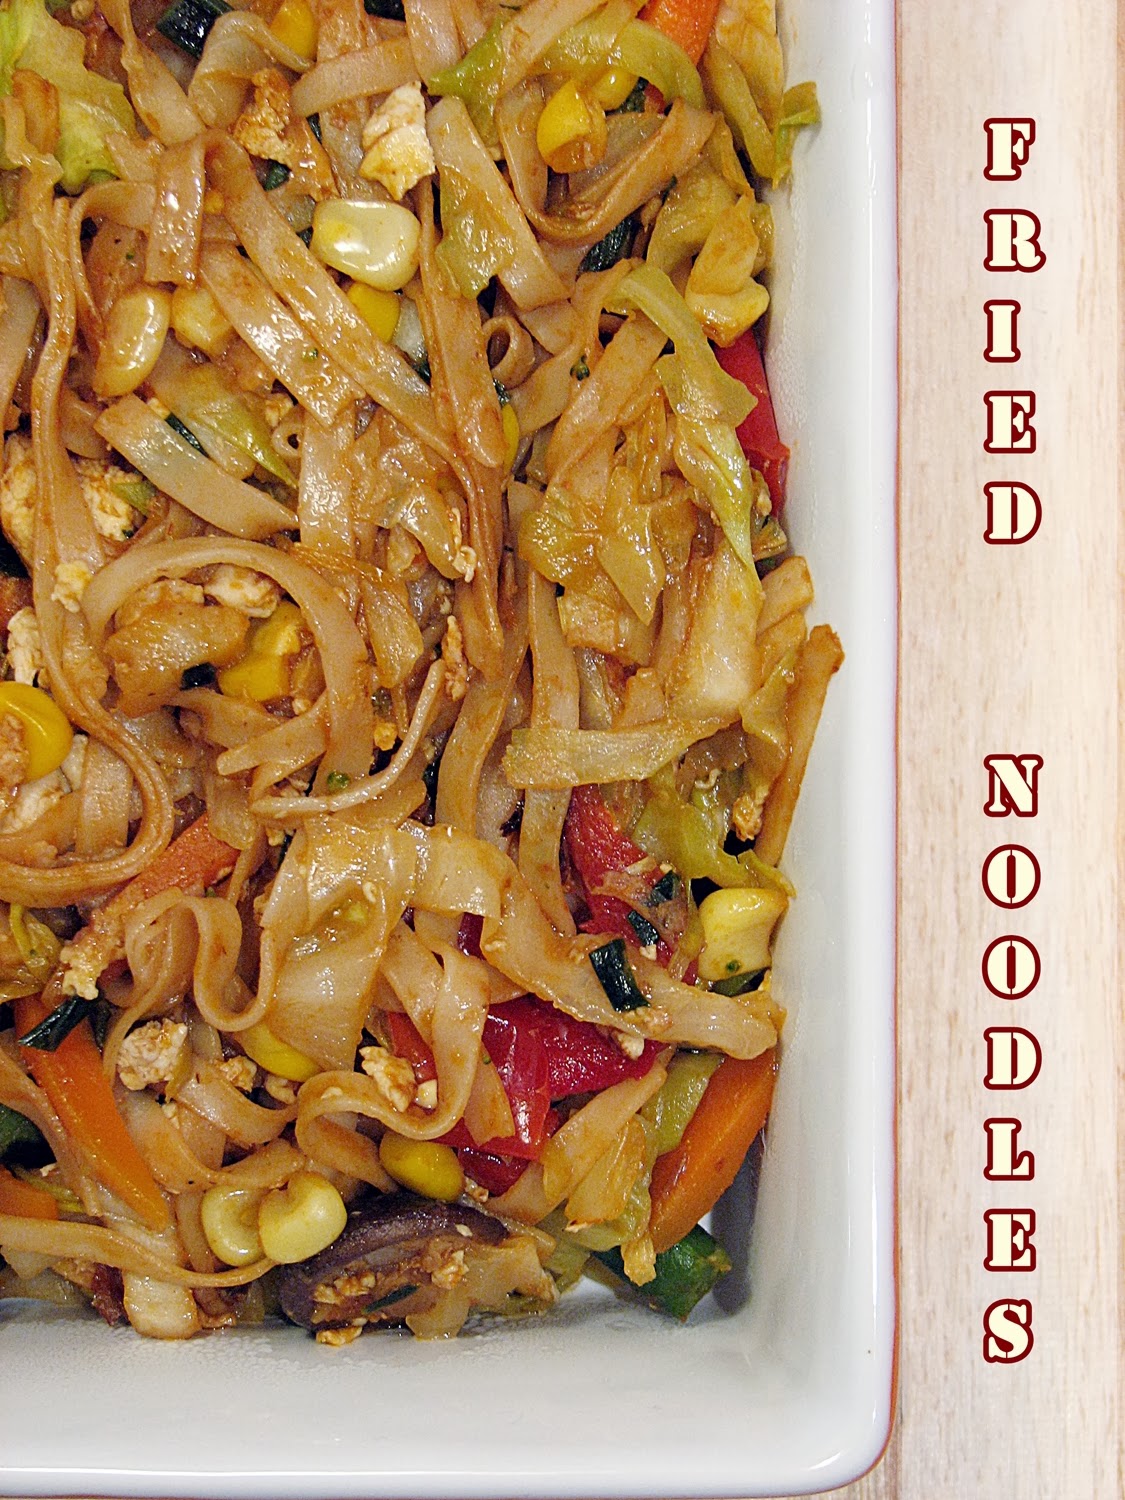
Super simple recipe for a quick week day dinner with exotic flavors
Source: Adopted from Rasa Malaysia blog
Taste: 5 (out of 5)
Difficulty: 1 (out of 5)
Ingredients:
- 2 cups of Asian noodles of your choice
- 2 tbsp canola oil
- 1 cup shredded cabbage
- 1 cup stir fry vegetable mix
- 1/2 cup corn kernels
- 2 tbsp sweet white wine
- 2 tbsp green onions or chives
For the sauce:
- 1 tbsp Sriracha
- 2 tbsp dark soy sauce
- 1 tbsp brown sugar
- 1/4 tsp salt
- 3 tbsp oyster sauce
- 3 tbsp katchup
- 1 tsp garlic powder
- 1 tbsp shrimp paste
Total: 3 servings (as main dish)
Directions:
1. In a medium sized pot bring 3 cups of water to boil, cook the noodles in boiling water for 1/2 - 1 minute, drain and set aside.
2. In a small bowl mix all the sauce ingredients and set aside
3. Preheat a large wok or frying pan over high heat. Add canola oil, let it warm up and add the eggs. Stir the eggs for 20-30 seconds until scrambled.
4. Add the noodles, vegetables, cabbage and corn and continue stirring for 3-5 minutes, until cooked.
5. Add the sauce and stir well until all the vegetables are coated.
6. Add the wine and the shallot, stir and serve.
Afterthoughts:
- This is a really simple and quick recipe, that takes 15-20 minutes from start to finish, and tastes delish.
- You can also add chicken or shrimp. The version here is almost vegetarian, as long as you don't mind the oyster sauce and the shrimp paste.
To Recipe...
Summary only...
Delicious falafel with a little twist
Source: Improvised based on this recipe from Epicurious
Taste: 5 (out of 5)
Difficulty: 3 (out of 5) - for scraping the food processor, rolling and refrigeration
Ingredients:
- 2 cups dried garbanzo beans / chickpeas
- 1 medium yellow onion
- 1/2 cup parsley
- 1 tbsp salt
- 1 tsp hot red pepper
- 8 garlic cloves
- 1 tbsp cumin
- 2 tsp baking powder
- 4 tbsp / 1/4 cup flour
- 4 tbsp / 1/4 cup peanut butter
Total: about 40 falafels
Directions:
1. In a large bowl, soak the dried chickpeas in cold / lukewarm water at room temperature overnight. The water level should be 1-2 inches above the chickpeas, and the bowl should be large enough to have room for the chickpeas to double in volume, as they absorb the water. Drain the chickpeas before continuing, but reserve a little liquid just in case your falafel mix turns out a bit dry.
2. Now you will need a food processor. If your food processor is large enough to accommodate all the ingredients, you can first process the chickpeas with the onion. You want to reach fine grainy consistency (like uncooked chia seeds), but not puree them (that would be hummus). You might want to pulse the food processor several times and scrape the sides of the bowl periodically to get uniform texture. Then add the rest of the ingredients and pulse more.
3. My processor is 9 cups, so I processed the chickpeas in 2 batches: half the chickpeas with all the flour and peanut butter. I processed this batch to an almost-paste consistency, In the second batch I processed the rest of the ingredients until they had a grainy texture. Then I combined the 2 batches and mixed in the baking powder at the very end.
4. Your "batter" should be still grainy but should be sticky enough to hold the shape when rolled into balls. Refrigerate the batter for 2-3 hours.
5. Shape the mix into small balls, approximately the size of a ping pong ball, and arrange on a parchment lined baking sheet. Refrigerate for 15 minutes. You can also freeze the falafels at this stage. Place them on a baking sheet in the freezer for 4 hours or more, and once they are completely frozen, remove them from the sheet into freezer bag and store until needed. If the frozen falafels stick to the baking sheet on which they were frozen, place the sheet on a towel soaked in hot water for several seconds, and it will release the falafels. To prepare the baked falafels, thaw them in the refrigerator overnight, and proceed to the next step.
6. Preheat the oven to 400F and bake the falafels for 10 minutes. Then turn on the broiler to high and broil for 3 more minutes.
7. Remove from the oven and serve with warm pita bread, pickles and tahina.
Afterthoughts:
- I tried several other falafel recipes, but they ended up too dry. Maybe this would not be a big obstacle for deep-fried falafels, because the hot oil would keep the batter together, but if you bake them, they simply fall apart. Hence the addition of the secret ingredient: the peanut butter! It is sticky and helps keep the mix together. And it adds a nice subtle flavor. In most circumstances I am not a fan of peanut butter, but I think that in this recipe it's a great addition.
- Don't over-bake your falafels. They will never look as brown and crisp as the deep fried ones. But that's ok. They will still taste moist and yummy, and since they go inside the pita, you won't really see them that much.
- If you are allergic to peanut butter, try another nut butter instead, like tahini (sesame seed butter), cashew butter, etc.
To Recipe...
Summary only...
Delicious, crumbly, soft and gooey - all that a pecan pie should be
Source: Adapted from allrecipes
Taste: 5 (out of 5)
Difficulty: 2 (out of 5)
Ingredients:
For the crust:
- 1 1/2 cups flour
- 1/4 cup sugar
- 1/4 tsp salt
- 1/2 cup margarine
For the filling:
- 2 eggs
- 1/2 cup corn syrup
- 1/2 unpacked brown sugar
- 1 1/2 tbsp margarine melted
- 1 tsp vanilla extract
- 1 1/4 cups chopped pecans
Total: 16 squares or 1 9 inch pie
Directions:
1. Grease a 9 inch pie pan or a 10x10 baking dish, if making the bars. Preheat oven to 350F.
2. Mix the flour, the sugar and the salt. Add cold margarine or butter and work it into the flour using Pastry Blender
3. Press the dough (with your hands or a small rolling pin) into the baking dish and bake for 20 minutes.
4. In the meantime prepare the filling. Melt the margarine and let cool slightly (it should be tepid, but still liquid).
5. Lightly mix the eggs with corn syrup and brown sugar until the sugar dissolves.
6. Add vanilla extract and margarine and mix well again.
7. Mix in the pecans.
8. When the crust is ready, pour the filling over it and continue cooking for another 35 minutes, until the filling solidifies.
9. Leave the bars in the pan on a wire rack to cool completely. It's better to refrigerate the pie overnight before removing from the pan and slicing.
Afterthoughts:
- The bars taste great, but I would still like to improve this recipe.
- The original recipe calls for more sugar and corn syrup for the filling. I find it to be too much as it is. I might reduce corn syrup to 1/4 or 1/3 cup next time.
- The eggs create a little foam in the filling. I tried to beat them as little as possible, but could not skip the beating completely because I had to dissolve the brown sugar. Maybe next time I should try mixing the sugar with the melted margarine, and once the lumps are dissolved, adding the eggs.
- There were some dryer and wetter patches on the crust. The crust dough was very flaky. Maybe next time I should use a bit more margarine for binding, and bake the crust for 25 minutes,
To Recipe...
Summary only...
Simple 3 ingredient juice that can be made in any blender if you are using seedless grapes
Source: improvised
Taste: 5 (out of 5)
Difficulty: 1 (out of 5)
Ingredients:
- 3/4 lb / 300 g honey dew melon peeled and cubed
- 3/4 lb / 300 g watermelon peeled and cubed
- 3/4 lb / 300 g red grapes
- 6 ice cubes
Total: 4 servings
Directions:
Place all ingredients in your Vitamix, process for 30 seconds on speed 5, using the tamper to push the fruit down. When there are no large fruit chunks left, set the blender to high and process for about 1 minute for grapes with seeds, or for 30 seconds for seedless grapes.
Afterthoughts:
- Very sweet and refreshing juice, only raw fruits and vitamins, what can be better?
- If you are using seedless grapes, any blender can do. But using Vitamix
will completely crash the seeds and get you all those vitamins hidden in them (or so their sales people say).
Love my Vitamix :-)
To Recipe...
Summary only...
Amazingly delicious, perfect fall comfort food, vegetarian and can be vegan too, but will satisfy any carnivore
Source: my mom
Taste: 5 (out of 5)
Difficulty: 2 (out of 5)
Ingredients:
- 1 lb chanterelle mushrooms
- 1 large yellow onion
- 4 cloves garlic
- 6 medium russet potatoes
- 2 tbsp canola oil (or use another vegetable oil)
- 2 tbsp butter (use vegetable oil for vegan version)
- 1 tbsp cognac or rum
- 1 cup vegetable or beef stock (or 1 tsp Better than Bullion paste dissolved in 1 cup of hot water)
- 3-4 bay leaves
- 1/4 tsp ground black pepper
- 1/2 tsp kosher salt
Total: 4 servings
Directions:
1. Clean the chanterelles. You are supposed to clean the mushrooms with a paper towel or a brush, and not wash them, so that they don't absorb moisture, but I do wash them, especially wild mushrooms like chantelles.
2. Roughly chop the onion.
3. Preheat a Dutch oven or a large pot over medium heat, warm up the oil and add the butter, if using. When the oil warms up and the butter melts, add the onions and sautee for about 10 minutes until translucent, stirring occasionally.
4. Peel and chop the garlic and add to the onions. Sautee for another 2 minutes.
5. Add the mushrooms, the cognac, the bay leaves, the pepper and the salt. Let cook for about 20 minutes, stirring every 5 minutes or so.
6. Peel the potatoes, chop them into 1 inch cubes and add to the mushrooms. Add the stock, stir the ingredients, increase the heat to medium high and bring to simmer.
7. Reduce the heat to slightly below medium, cover and let cook for another 20 minutes. Gently stir once or twice during this time, try not to mash the potatoes (the stew will still be delicious, but it will look even more rustic).
8. Total cooking time would be about 1 hour. When the potatoes are cooked, your stew is ready. Serve with crusty bread and salad.
Afterthoughts:
- This is simply the best imaginable dinner on a cold autumn night.
- This stew would work with other mushrooms as well. Champignons and portabellas will do for sure, with exactly the same directions. For other wild mushrooms one might need to adjust the cooking times.
To Recipe...
Summary only...
Yummy, simple and great for any occasion
Source: Japanese Potato Salad from Nami's Just One Cookbook
Taste: 5 (out of 5)
Difficulty: 2 (out of 5)
Ingredients:
- 2 Russet potatoes
- 1/2 tsp salt
- 1 egg
- 2 1/2 inch carrot
- 1/4 cup corn kernels
- 2 inch English cucumbers
- 2 slices of ham or bologna
- 1/3 cup mayonnaise
- 2 sprigs of parsley
- salt
- black pepper
Total: 8 servings
Directions:
1. Peel potatoes and cut into 1 inch cubes. Boil them on high heat, and after the water boils, let cook for another 10-15 minutes until done. Drain the water and mash the potatoes but leave some small chunks for texture. Sprinkle with salt and transfer into a big bowl.
2. In the meantime prepare a boiled egg. Peel and mash the egg with a fork in a small bowl.
3. Cut carrots into 1/8 inch cubes, put them in a microwave-safe container and cover with water. Microwave for 30 seconds on high and drain.
4. Cut the cucumbers and the bologna or the ham into 1/8 inch cubes.
5. If using canned corn kernels, drain them. If using frozen, place into a small microwave bowl, add 2 tablespoons of water and microwave on high for 1 minute. Drain the water.
6. Roughly chop the parsley.
7. Add all the ingredients into the mashed potatoes. Sprinkle with salt and pepper and mix well. Add mayonnaise and mix until incorporated.
8. Refrigerate until ready to serve. Will keep in refrigerator for 2 days.
Afterthoughts:
- This is a pretty simple potato salad, mashing the potatoes, as opposed to slicing them, saves some time.
- You can also add pickled cucumber, green onions or green peas, depending on your preferences.
- Check out Nami's blog for step by step photos, and add Japanese mayo to make this salad Japanese :-).
To Recipe...
Summary only...
A slice of delicious moist cake for only 135 calories!
Source: Mom on Timeout
Taste: 5 (out of 5)
Difficulty: 1 (out of 5), if the carrots are already shredded
Ingredients:
- 1 1/4 cup unsweetened applesauce (130 cal)
- 1 1/2 cup white sugar (1160 cal)
- 3 eggs (210 cal)
- 2 cups all-purpose flour (870 cal)
- 1 tsp baking soda mixed with 1 tbsp lemon juice or apple vinegar to activate
- 1 1/2 tsp baking powder
- 1/2 tsp salt
- 3 cups grated carrots (135 cal)
- 1 tsp vanilla (10 cal)
- 1 cup Dole pineapple in juice, crushed, not drained (160 cal)
Total: 9x13 inch cake, 20 servings, 2675 cal, 135 cal / serving
Directions:
1. Lightly grease a 9x13 inch baking sheet.
2. Combine all ingredients in a large bowl and mix (you don't really need a mixer for this batter, a whisk is enough)
3. Pour the ingredients into a lightly greased 9x13 inch baking sheet and cook in oven preheated to 350F for about 40 minutes, until the cake is golden and a toothpick tester comes out clean. (In my oven it always takes much longer, I baked on 375F for 70 minutes.)
4. Let cool on a rack, slice and serve.
Afterthoughts:
- Only when I started mixing all the ingredients I noticed that there is no butter or oil in the recipe. I was skeptical if it would turn out ok, but it was too late to look for another recipe, so I continued, and the cake turned out really delicious. I would not be able to guess that it's completely fat free (well, of course there is fat in eggs, etc.)
- I completely skipped the frosting from the original recipe. I also skipped the nuts, added more carrots instead, skipped the cinnamon (it's not the cinnamon's fault, it's me), and reduced the sugar. The cake still turned out sweet and delicious.
To Recipe...
Summary only...
Lighter and faster version without deep frying and using a ready made sauce.
Source: A combination of Martha Stewart's and Heather's recipes
Taste: 4 (out of 5)
Difficulty: 2 (out of 5)
Ingredients:
- 1 lb skinless boneless chicken breasts or thighs, cut into 1 inch pieces
- 3 tbsp cornstarch
- 2 egg whites
- 1/2 tsp salt
- 1/4 tsp black pepper
- 1/2 lb green beans
- 1/2 cup Trader Joe's Genereal Tso's Sauce
- 2 tbsp canola oil for cooking
Directions:
1. In a medium sized bowl whisk together egg whites, cornstarch, salt and pepper. Add chicken, and toss to coat. Refrigerate from 15 minutes to several hours to marinate the chicken.
2. Heat a 2 tbsp of oil in a large non stick skillet over medium-high heat. Transfer chicken pieces into the skillet, shaking off the egg white batter. Cook for about 10 minutes until golden, stirring occasionally. If there is too much chicken to fit in 1 layer on the pan, you can do the frying in 2 batches.
3. When the chicken is cooked, remove it to a plate.
4. Pour the green beans and the sauce onto the skillet and cook stirring for 4-5 mintues, until the beans are soft and the sauce thick. Add the chicken to the pan and stir to coat it with the sauce.
5. Serve over white rice (or cauliflower rice).
Afterthoughts:
The taste is good, but the lighter version does not give you the deep frying crunch that I did not really expect, but was secretly hoping for. Oh, well... And maybe I would add 2 more tablespoons of sauce next time.
To Recipe...
Summary only...
Quick, easy, healthy, vegan, gluten free, low cal, filling and even pretty tasty :-)
Source: Many blogs for example Everyday Maven has nice step-by-step pictures
Taste: 5 (out of 5)
Difficulty: 2 (out of 5), and not 1 because I am too lazy to chop cauliflower in batches

Ingredients:
- 1 medium sized cauliflower (140 cal)
- 1/2 tbsp olive or canola oil (60 cal)
- pepper and salt (optional)
Total: 200 cal, 4 servings, 50 cal/serving
Directions:
1. Wash cauliflower, cut it, discard the core and break of the florettes until you have pieces of approximately the same size.
2. Place the florettes in a food porcessor in 1 layer, do not overcrowd the food processor. In my food processor I have to shred a medium sized cauliflower in 3-4 batches.
3. Process until you get "rice" consistency. In my case I let the food processor run on high for 10 seconds and then pulse for 2 seconds 5 times.
4. At this stage you freeze a batch of your cauliflower rice in a zip lock bag for future use. You could then defrost the batch for 15-30 minutes and cook as usual. It turns a little mushier than freshly cooked, but pretty similar.
5. In a large non-stick frying pan heat 1/2 tbsp of oil over medium-high heat, add the cauliflower and cook for 5-10 minutes, stirring occasionally.
6. You can also add salt and pepper or other spices (turmeric, cumin, etc) while cooking. Or don't add anything if you want plained steamed rice.
Afterthoughts:
This is a really nice trick to make your meal healthier and eat waaaay less calories. In one cup of white rice there are 200 calories, in one cup of cauliflower rice there are 50: you save 75% of calories! And taste / texture - wise it works pretty well as a substitute for the "real" thing. Especially if you make fried rice, you might never notice the difference.
To Recipe...
Summary only...
Delicious South East Asian - inspired curry with substitutions for those of us who don't have exotic ingredients
Source: Adjusted from Granny's Malasian Meatball Curry on Food.com
Taste: 5 (out of 5)
Difficulty: 3 (out of 5)
Ingredients:
For the meatballs:
- 1 1/2 lbs ground beef
- 1/4 cup breadcrumbs
- 1 large egg, lightly beaten
- 2 tbsp finely chopped spring onions
- 2 tablespoons finely chopped cilantro
- 1 tbsp Worcestershire sauce
- 1/2 tsp salt (or to taste)
- 1/4 tsp ground black pepper (or to taste)
For the curry:
- 2 medium onions, peeled
- 5 cloves garlic, peeled
- 3/4 inch fresh ginger, peeled
- 1 1/2 tbsp curry powder
- 1/2 tsp turmeric
- 1/2 tsp cumin
- 1/2 tsp ground coriander seeds
- 1/2 tsp mango powder (optional)
- 1/2 tsp cinnamon
- 1/4 tsp cayenne
- 2 tbsp coconut or vegetable oil
- 4-5 bay leaves
- 1 cup coconut milk
- 1 cup water
- 1 large potato, peeled and cut into medium-sized cubes
- 2-3 tbsp tomato paste
- 1 tbsp brown sugar, packed
- 1/2 tsp salt
Total: 4-5 servings
Directions:
1. Grind onion, garlic and ginger to a paste in a food processor.
2. Heat the oil over medium high heat in a wok or a large frying pan, and stir fry the onion paste for about 5 minutes.
3. Combine curry powder, turmeric, cumin, coriander, mango powder, cinnamon and cayenne and add a little water to make paste.
4. Add the curry paste and the bay leaves to the wok and stir fry for another 5-10 minutes until quite toasted and the oil starts to ooze out.
5. Add coconut milk and water and bring slowly to the boil.
6. While the curry sauce is heating up, combine all the ingredients for the meatballs in a large bowl and start rolling meatballs the size of ping-pong balls. There will be about 30 meatballs, and the small size will make sure that they cook fast. While making the meatballs, stop occasionally and stir the sauce gently.
7. Once the sauce boils, add the tomato paste, the sugar and the salt and mix well. Then add the meatballs, cover and simmer on medium heat for 10 minutes. You can add more water if necessary.
8. Add the potato and simmer uncovered for another 15 minutes, stirring occasionally.
9. Server over steamed rice.
Afterthoughts:
- These meatballs are really delicious, very rich - the perfect comfort food, hence calorie count omitted ;-). I will be making many more of them. The only change I might make is skipping the cinnamon, but if you are not sensitive to cinnamon, you might prefer keeping it.
- I followed the original recipe pretty closely, my main adjustments were making substitutions for ingredients that I did not have, such as Malaysian curry powder and curry leaves. I would love to try those if I ever find them. I also added brown sugar.
- I might try reserving some of the curry paste after frying before adding the coconut milk and add it to the meatball mixture - to have the flavors inside and out.
To Recipe...
Summary only...
A really nice crepe recipe, great for both sweet and savory versions.
Source: http://allrecipes.com/recipe/basic-crepes/ with small variations
Taste: 5 (out of 5)
Difficulty: 1 (out of 5)
Ingredients:
- 1/2 cup all purpose flour (230 cal)
- 1 egg (70 cal)
- 1/4 milk (70 cal cal)
- 1/4 water
- 1 tbsp butter (100 cal)
- 1/8 tsp salt
Total: 4 crepes, 470 cal, 120 cal/crepe
Directions:
1. Heat the milk, the water and the butter in a microwave for 20 seconds to bring to lukewarm temperature and mix until the butter melts.
2. Whisk all the ingredients together and refrigerate overnight.
3. Preheat a frying pan on medium heat for at least 1 minute. Lightly grease with butter (only for the first crepe).
4. Whisk the batter once again before using and pour 1/4 cup per crepe into the frying pan and immediately rotate the pan to spread the batter.
5. Cook for about 1 minute and flip using a thin spatula. Cook for another minute on the other side. Remove from the pan and keep in an oven preheated to 200F until all the crepes are ready.
6. Serve with savory or sweet filling.
Afterthoughts:
This is the only crepe recipe that used water, and not just milk. But on the other hand it had the most reviews on Allrecipes, so I tried it. I also saw the tip on warming up the milk and refrigerating the batter in other recipes, so I made those changes. These crepes are really light and a little crispy, and were super easy to flip. I made one savory with egg and cheese and one faux crepe suzette: microwaved orange marmalade for 10 seconds just to melt it a bit, instead of making the real orange sauce. Both were very nice.
To Recipe...
Summary only...
Super simple recipe, all you need is 2 ingredients and patience
Source: bcmom's kitchen
Taste: 5 (out of 5)
Difficulty: 1 (out of 5)
Ingredients:
- 1 small cabbage, about 1 lb (120 cal)
- 1/2 tbsp sea salt
- 1/2 tsp caraway seeds (optional)
Total: 120 cal, 4 servings, 30 cal / serving
Directions:
1. Wash the cabbage, remove and reserve outer leaves and shred the rest.
2. In a large bowl, toss cabbage & salt together and knead the mixture for a minute or 2. If using, mix in the caraway seeds too.
3. Let sit for 5-10 minutes. The cabbage should soften, become limp and start releasing juice.
4. Pack the cabbage in a glass jar as tightly as possible. Try to eliminate air bubbles and keep the cabbage submerged in the juice.
5. Cover the cabbage with the outer leaves and press down once again to keep the outer leaves also submerged.
6. Cap the jar loosely and leave in a dark place at room temperature.
7. Check on your cabbage every 2-3 days, release the air if it's too bubbly, remove the bloom, if needed, and press the cabbage down to keep it submerged in the liquid. The cabbage should be ready in 1 week, but it tastes better after 2.
8. Keep the ready sauerkraut in refrigerator.
Afterthoughts:
- This was the first time for me making sauerkraut. I was skeptical and thought it would turn out coleslaw-like. But it turned out AMAZING! Crunchy and salty and perfect! It completely exceeded all my expectations.
- I will skip the caraway seeds next time and maybe add garlic.
- This post was my SRC assignment. Just in case you don't know yet, SRC, or the Secret Recipe Club is a group of over a hundred food bloggers, who are assigned a "secret" blog each months. Then they choose a recipe from that blog, make it and post it on their own blog on a given reveal day. Then there is a big party, where you hop from one blog to another and check what everyone's been cooking. Lots of fun! And terrible for your diet ;-) I want to thank Amanda, Jane and April for making it all possible!
- bcmom's kitchen, my SRC assignment for July, is a great blog with lots of delicious recipes. Desserts and breads immediately caught my attention, but these days I am trying to watch calories, so I opted for a practically calorie-free cabbage recipe. You should visit that blog and check out the other goodies therein :-).
To Recipe...
Summary only...
The perfect silky smooth soup: 1 minute prep, 10 minutes cooking
Source: Improvised
Taste: 5 (out of 5)
Difficulty: 1 (out of 5)
Ingredients:
- 200 g portabella or button mushrooms (45 cal)
- 50 g roasted onions (20 cal)
- 10 g roasted garlic (15 cal)
- 2 cups milk (220 cal)
- 1 1/2 tbsp rice flour or all purpose flour (60 cal)
- 2 tsp Better than Bullion Chicken base (30 cal)
- 2 sprigs of fresh dill
- 1/8 tsp black pepper
Total: 390 cal, 2 generous servings, 195 cal/serving
Directions:
1. Place all ingredients into Vitamix in the order listed.
2. Start Vitamix on speed 1, gradually increase to 5, blend for 5 seconds, increase to 10 and switch to High. Let run for 8-10 minutes until steam starts escaping from the cover.
3. Done!
Afterthought:
- I could not find any cream of mushroom recipes for Vitamix, so I thought that maybe Vitamix does not do a very good job on these, given that in normal mushroom soups, you need to saute the mushrooms first. So I made a small experimental batch and it immediately exceeded all my expectations: Simply excellent soup! With the perfect mushroom aroma and silky smooth texture. And with less than 200 calories per serving you can have it with your favorite crusty bread without any guilt :-). This is the second time I am making this recipe and certainly not the last one.
- This recipe uses roasted garlic and roasted onions. I make those in large batches once a while and freeze in small portions. It's very handy to have those on hand. And because they are roasted in the oven with hardly any oil, they are mush more diet-friendly than their pan fried cousins. Here is my recipe for making roasted garlic cubes.
To Recipe...
Summary only...
Add potatoes to your bread to help keep it fresh
Source: Tea and Scones blog (originally from Dawn's Simply Sweet blog)
Taste: 5 (out of 5)
Difficulty: 2 (out of 5)
Ingredients:
- 1 1/2 pounds russet potatoes (about 3)
- 1 1/2 tbsp salt
- 1/2 cup tepid reserved potato water (80F to 90F)
- 1 tbsp active dry yeast
- 2 tbsp olive oil
- 3 cups unbleached all-purpose flour
- 1 3/4 cups rye flour
Directions:
1. Quarter and boil russet potatoes until fully cooked. Remove from water and allow to cool for at least 20 minutes, do not peel. Reserve the water.
2. Once the water is cool to the touch, measure 1/2 cup to proof the yeast. In the meantime mash the potatoes with potato masher or in a stand mixer with the paddle attachment.
3. Then add the flours, the creamy yeast mixture, olive oil and salt. Replace the paddle is replaced with the dough hook and start kneading. 4. At first the dough looks dry and crumbly, but after several minutes it comes together. It should take about 10-12 minutes for the dough to become smooth.
5. Cover the bowl and allow the bread to rise for 20-30 minutes.
6. Divide the ready dough in half and shape each half into an oval loaf. Or you can fill the loaves, like Dawn did. Let the bread rise for another 30 minutes, covered with a wet towel or a wet paper towel.
7. Place a broiler pan on the lower rack of the oven to be filled with water for the steam and place a pizza stone on the upper rack. Preheat to 375F.
8. Right before baking, slash the tops of the loaves. Slide the loaves onto the baking stone and pour a cup of hot water into the broiler pan. Immediately close the oven door to trap the steam and bake for 45-50 minutes until the loaves are brown. They should make a hollow sound when you tap on them.
9. Let cool to room temperature, for about 20-30 minutes, before slicing and eating. Enjoy!
Afterthoughts:
- The bread was delicious! It tastes like any "normal" bread, there is no "potato taste," but somehow the addition of potato helps keep the bread fresh. But the bread might be gone before you get a chance to test this ;-).
- This post was my SRC assignment. Just in case you don't know yet, SRC, or the Secret Recipe Club is a group of over a hundred food bloggers, who are assigned a "secret" blog each months. Then they choose a recipe from that blog, make it and post it on their own blog on a given reveal day. Then there is a big party, where you hop from one blog to another and check what everyone's been cooking. Lots of fun! And terrible for your diet ;-) I want to thank Amanda, Jane and April for making it all possible!
- This month I was assign Margaret's Tea and Scones blog. It has lots of great recipes, but the potato bread immediately drew my attention. And I am very happy with my pick :-).
To Recipe...
Summary only...
Delicious, healthy and simple dinner
Source: Adapted from I Was Born To Cook
Taste: 4 (out of 5)
Difficulty: 1 (out of 5)
Ingredients:
- 4 tilapia filets
- 1 onion, chopped
- 2 tbsp butter
- 2 tbsp brandy
- 1 cup light sour cream
- 3 tbsp fresh lemon juice
- 1 tsp freshly grated lemon peel
- salt and pepper
Total: 4 servings
Directions:
1. Melt 1 tbsp of butter in a medium sized saucepan and saute the chopped onion stirring from time to time until until transparent, about 10 minutes.
2. Add the brandy, increase the heat and bring to boil. This will happen very quickly because there is very little liquid. Reduce the heat to medium and cook until brandy is almost evaporated.
3. Reduce the heat to low, add the sour cream and the lemon juice and peel, and stir until the sour cream is warm but not boiling.
4. Reduce the heat to the lowest possible setting to keep the sauce warm and make the fish.
5. In a large skillet melt the remaining butter on medium high heat. Add tilapia filets, season with salt and pepper and cook until nicely browned for about 3-4 minutes on each side.
6. To serve top the fish with the sauce and serve additional sauce on the side.
Afterthoughts:
- The sauce is wonderful, a little sour and lemony and pairs perfectly with the fish. And it is so simple to make. Goes well with roasted veggies of your choice.
- This post was my SRC assignment. Just in case you don't know yet, SRC, or the Secret Recipe Club is a group of over a hundred food bloggers, who are assigned a "secret" blog each months. Then they choose a recipe from that blog, make it and post it on their own blog on a given reveal day. Then there is a big party, where you hop from one blog to another and check what everyone's been cooking. Lots of fun! And terrible for your diet ;-) I want to thank Amanda, Jane and April for making it all possible!
- This month my assigned blog was a real treat - Melissa's site I Was Born To Cook is full of wonderful simple recipes. Many are Greek or Italian, but I think anyone can find recipes to their taste. I got so excited, that I changed my dinner plans and made the SRC recipe on the same day. In fact, I made 3 recipes from Melissa's blog on the same day ;-). I also made her Buttermilk Ranch Dressing (YUM!) and her Garlic Bread (YUM-YUM!). So I owe Melissa a triple Thank you! I will be visiting her blog much more and so should you :-).
To Recipe...
Summary only...
Delicious Indonesian beef stew, beef rendang, adopted for western ingredients. They say that a picture is worth a thousand words; in this case one whiff is worth a thousand pictures: your house will smell amazing all day!
Source: Adapted from Singapore Shiok and No Recipes
Taste: 5 (out of 5)
Difficulty: 3 (out of 5)
Ingredients:
- 1.5 lb sirloin steak, cut into 1/2 inch cubes
- 1/2 tsp salt
- 1/2 tsp ground coriander
- 1/4 tsp turmeric
- 1/2 tsp ginger powder
- 2 garlic cloves
- 2 shallots
- 1/2 tsp ground chili pepper
- 1 stalk of lemongrass
- 1 tbsp vegetable oil
- 1 can coconut milk
- 1 tbsp lemon juice
- 1/2 tsp sugar
- 1/4 tsp chili sauce
Total: 4 servings
Directions:
1. Discard the outer leaves of the lemon grass, keep only the white part. Finely chop the lemongrass, the garlic and the shallots. Place in the food processor. Add the salt, coriander, turmeric, ginger, chili pepper and process until you have a smooth paste. You might need to scrub the sides a few times.
2. Preheat a frying pan on medium heat and saute the paste until fragrant (about 5 minutes), stirring frequently. Remove the paste in a bowl, do not wash the frying pan.
3. Add oil to the frying pan and in batches, not to overcrowd the pan, fry the meat until browned on all sides (about 3-4 mintues on each side). Remove the ready batches and keep in the same bowl with the paste.
4. Return the paste and the meat to the frying pan and add the coconut milk. Stir well, and let cook on medium-high heat for about 10 minutes, until simmers. Add sugar, lemon juice and chili paste, stir, reduce the heat to low, cover with the lead and let cook for 2 hours, stirring every 20 minutes or so.
5. By the time the beef is ready the liquid will have almost completely evaporated. Serve with rice.
Afterthoughts:
- I love beef rendang, and this was probably the best one I've had. The beef was super tender and the sauce was amazing. And the house smells delicious for the rest of the day.
- The original recipes required some exotic vegetables that I could not find, like kaffir lime leaves and galangal, so I had to find substitutes. Also, I like my beef rendang very mild, so I significantly reduced the chili component, and increased the coconut milk. Also, I used a different cut of meat and smaller cubes, so I decreased cooking time.
- It is really challenging to grind lemongrass into a paste, because it's extremely fibrous. You might need to add water to your food processor, but even that might not necessarily help. The last time I made this stew I first chopped the lemongrass, then ground it in a meat / food grinder, then added water and processed in a blender. It was a very lengthy process but this was the first time I did not have lemongrass fibers in my food. I think next time I will prepare a large batch of lemongrass, and then make lemongrass paste cubes and freeze them for future use, similarly to roasted garlic cubes.
To Recipe...
Summary only...
3 delectable layers from 1 simple batter - it's a kind of magic...
Source: Old Time Cooking Recipes
Taste: 5 (out of 5)
Difficulty: 1 (out of 5)
Ingredients:
- 4 eggs, separated, at room temperature (280 cal)
- 1/4 tsp apple cider vinegar
- 1 tbsp water
- 3/4 cup / 150 g sugar (580 cal)
- 2 tsp vanilla extract (20 cal)
- 1 stick / 125 g butter, melted (900 cal)
- 1 cup / 115 g white cake flour (420 cal)
- 2 cups / 500 ml milk, lukewarm (320 cal)
Total: 2520 cal, 12 servings, 210 cal/serving
Directions:
1. Whisk egg whites. When the peaks start forming add the vinegar, to stabilize the whites, and continue whisking until stiff.
2. In another bowl, beat the egg yolks with the sugar, water and vanilla until light. Add melted butter and continue beating for another minute. Then sift in the flour and mix.
3. Add the milk (it has to be lukewarm, otherwise the butter will harden) and beat until well incorporated.
4. Add about 1/4 of the egg white mixture and whisk to lighten the batter. Then gently fold in the rest of the egg whites using a spatula.
5. Grease and dust with flour a 8x8 inch square pan or a 9 inch round pan. Do not use spring form because batter is too liquid and the pan could leak.
6. Pour the batter into the pan and bake in preheated 325F oven for about 60-80 minutes or until the top is golden.
7. Cool in the pan for at least 3 hours. Serve sprinkled with powdered sugar.
Afterthoughts:
- Yummmm - what more can I say! My favorite layer is custard :-)
- In my case the top was refusing to brown evenly and then eventually it cracked a bit, but it still tasted amazing!
- You can also make this into cupcakes. If using standard sized muffin tins, this makes 12 cupcakes. Line the tins and fill to the rim and bake for 30-35 minutes. The same magical taste only in individual servings :-)
To Recipe...
Summary only...
Gooey, yummy and super quick flourless cookies.
Source: Adapted from Ooey Gooey Rocky Road Cookies of Fifteen Spatulas
Taste: 4 (out of 5)
Difficulty: 1 (out of 5)
Ingredients:
- 1 1/2 cups sugar
- 1/3 cup unsweetened cocoa powder
- pinch of salt (1/8 tsp)
- 2 egg whites
- 1/2 tbsp vanilla extract
- 1/2 cup semisweet chocolate chunks
- 1/2 cup sliced almonds or walnuts, toasted
- 1/2 cup mini marshmallows
Total: 12 giant cookies
Directions:
- Preheat the oven to 350F, and line a large baking sheet with parchment paper.
- In a large bowl, mix together the sugar, the salt and the cocoa powder. Add the egg whites and vanilla and whisk until combined. Stir in the chocolate chunks and the almonds.
- Use a 2 tbsp cookie scoop to portions out small balls of dough onto the parchment paper, spacing them at least 3 inches apart, because the cookies will spread. Then top each cookie with 4-5 marshmallows. Pop into the freezer for 5 minutes to chill slightly to minimize the spreading.
- Bake for 12-13 minutes until the marshmallows are golden brown. Let the cookies cool down on the baking sheet. Best served the same day.
Afterthoughts:
- These cookies are ooey gooey, brownie-like with great Rocky road texture. And the marshmallows on top are melted, roasted, yummy and delicious! The only thing I would change next time is reducing the sugar, quite a lot, maybe I would use 1/2 of the sugar, or at most 2/3. But I don't know what that would do to the texture: after all there is no flour in these cookies, so maybe the sugar is holding them together :-).
To Recipe...
Summary only...
A healthier version of a classic Italian dessert
Source: Adapted from An Italian Cooking in the Midwest
Taste: 3 (out of 5)
Difficulty: 1 (out of 5)
Ingredients:
- 1 cup non-fat yogurt
- 1 cup milk
- 1 tbsp gelatin
- 3 tbsp cold water
- 4 tbsp sugar
- 2 tbsp lingonberry syrup
- 1 tsp vanilla extract
Total: 4-6 servings (depending on serving size)
Directions:
1. Soak the gelatin in cold water for about 5-10 minutes until it blooms.
2. In the mean time warm the milk until it starts to boil. Add the sugar, the lingonberry extract and the vanilla and mix. Add the gelatin and mix until dissolved.
3. Remove the milk from the heat and add the yogurt. Mix well.
4. Using a strainer to leave out gelatin lumps, pour the mixture into serving bowls and refrigerate for several hours until set.
5. Decorate with your favorite fruit or sauce and serve cold.
Afterthoughts:
- I have to admit that I have deviated from the original recipe, it called for Greek yogurt, and I used a non-fat one, so my "panna cotta" lacked any creaminess and was more similar to yogurt jello. Another addition to the recipe that I made, using the lingonberry syrup, was probably another mistake, because as soon as I added it to the hot milk, it started separating. I love lingonberry syrup in milkshakes, it adds a really nice sweet and tangy flavor, but I did not account for the milk temperature in this case. So my panna cotta also did not look very pretty. Fortunately, the fruit topic hid the most of my wrong doings :-). And overall, after a heavy dinner, this panna cotta turned out to be a nice tangy dessert.
- This post was my SRC assignment. Just in case you don't know yet, SRC, or the Secret Recipe Club is a group of over a hundred food bloggers, who are assigned a "secret" blog each months. Then they choose a recipe from that blog, make it and post it on their own blog on a given reveal day. Then there is a big party, where you hop from one blog to another and check what everyone's been cooking. Lots of fun! And terrible for your diet ;-) I want to thank Amanda, Jane and April for making it all possible!
- Pola, the author of Italian in the Midwest, as the name of her blog suggests, has a lot of yummy Italian recipes on her blog, some classic and some with very original twists, for example her eggplant pesto. I will be back for that recipe.
To Recipe...
Summary only...
Delicious fluffy and soft buns that will remind you of Hawaiian bread
Source: Adapted from Pani Popo form Roxana's Home Baking
Taste: 5 (out of 5)
Difficulty: 2 (out of 5)
Ingredients:
- 3 cups all purpose flour
- 1 1/2 tsp active dry yeast (can use instant yeast)
- 2 tbsp lukewarm water
- 1 tsp salt
- 1 tbsp grapeseed oil (can use canola or coconut oil too)
- 1 can / 400 ml coconut milk (you might not need to use all of it)
- 1/3 cup sugar
Total: 8 buns
Directions:
1. Fill a small bowl with 2 tbsp lukewarm water and let rest for 5 minutes until bubbles appear and the yeast starts dissolving.
2. Combine the sugar with the coconut milk and stir until incorporated.
3. Sift the flour and the salt into a bowl of a stand mixer with dough hook, pour in the water with the yeast and start mixing, slowly adding coconut milk until the dough comes clean from the sides of the bowl. I used slightly less than 1/2 can, about 190 ml.
4. Transfer the dough into a greased bowl, cover with wet towel or wet paper towel and let rest at room temperature until doubles in size. In my case in a warm kitchen it took about 1 hour.
5. Divide the dough into 8 balls and place in a greased 9x13'' baking pan. Cover again with and let rest until double in volume (another 30-40 minutes).
6. In the meantime preheat the oven to 375F.
7. Pour the remaining coconut milk over the buns. You don't need to use all of it. I did and the buns turned a little too soggy at the bottom. Next time I will use 1/2 of the remaining coconut milk, about 100 ml or 1/4 can. You can also sprinkle raw sugar on top of the buns.
8. Bake for 40 minutes or until the buns are golden brown and the coconut milk is absorbed.
9. Server warm or cold.
Afterthoughts:
- These buns are super soft and fluffy. They are really great with butter and jam for breakfast.
- I followed the original recipe and poured all the remaining coconut milk over the buns, it was more than 1/2 a can, and it took very long for the milk to evaporate. Even though the buns were quite baked after 40 minutes, I had to keep them in the oven for another 30 minutes, until the milk was almost gone. I had to cover the top with parchment (so that it does not brown too much and burn) and decrease the temperature. And then eventually the buns were slightly soggy at the bottom. They tasted great, but I do not feel very comfortable eating soggy buns, so next time I will simply use less coconut milk. And I am sure I can find creative ways to use the remaining sweetened coconut milk (as a coffee creamer? or in a milkshake?)
To Recipe...
Summary only...
Freeze a batch of home made roasted garlic cubes, and they are ready to use whenever you need them.
Source: Improvised
Taste: 5 (out of 5) - for those who love roasted garlic
Difficulty: 3 (out of 5) - mainly time consuming

Ingredients:
1 lb whole garlic heads (or as many as you want)
Directions:
1. Preheat the oven to 400F. Line a baking sheet with a piece of aluminum foil, and place the garlic heads on the foil. The aluminum foil should be large enough to wrap around the garlic.
2. Cut the tops of the garlic heads (about 1/4 of the head), but keep the cut piece. Drizzle olive oil over the lower part of each head and cover with the upper part.
3. Wrap the aluminum foil so that it completely covers the garlic heads and seal the edges. Bake for 1 hour, then turn off the heat and keep in the over for one more hour.
4. Remove the baking sheet from the oven and discard the aluminum foil. When the garlic is at room temperature squeeze the flesh out of the cloves and mash it with a blender, a food processor, or a fork.
5. Line a flat tray (I used a plastic lid of a Pyrex pan) with parchment and spread the mashed garlic. Freeze until firm.
6. Cut into 1/2 inch cubes, separate the cubes and freeze in plastic bags. Use as needed :-)
Afterthoughts:
This is a really convenient way to store roasted garlic. Whenever you need some, you have just the right amount ready in the freezer. And it's very cheap, too: you can usually buy a 1 lb bag of garlic for $2-$3, and the cubes will last for a very long time.
To Recipe...
Summary only...
A cloud of chocolate Chantilly cream resting on hazelnut dacquoise and crunch. All coated with rich and creamy ganache. A chocolate dream come true.
Source:
Hazelnut Dacquoise adapted from foodilicOus
Hazelnut Crunch improvised
Cream Chantilly from "Chocolate: More Than 50 Decadent Recipes" by Dominique and Cindy Duby
Chocolate Ganache from Martha Stewart
Taste: 5 (out of 5)
Difficulty: 4 (out of 5)
Ingredients:
Hazelnut Dacquoise
- 40g ground hazelnuts
- 7g flour
- 50g egg whites
- 50g granulated sugar
Hazelnut crunch
- 1/4 cup ground hazelnuts
- 1/4 cup puffed rice cereal
- 40 g dark chocolate
Cream Chantilly
- 50 g dark chocolate
- 1 cup heavy cream
- 1 tsp Irish cream
- 1/4 tsp orange zest
Chocolate Ganache
- 50 g dark chocolate
- 1/4 cup heavy cream
- pinch of salt
Total: one 6 inch cake, 6 servings
Directions:
Hazelnut Dacquoise
1. Preheat oven at 350F and line a 6'' spring form pan with parchment paper.
2. Beat the eggs whites, gradually adding the granulated sugar until stiff.
3. Sift the flour into the ground hazelnuts. Pour the hazelnut meal mixture into the egg whites and blend delicately with a spatula.
4. Use a little (about a teaspoon) of the batter to glue the parchment to the side of your pan. Then pour the batter into the pan and spread evenly.
5. Bake at 350°C for 15-20 minutes (depends on your oven), until golden. Then turn the oven on and leave the dacquoise in the warm oven for another 30 minutes. In the meantime prepare the crunch.
Hazelnut Crunch
6. Crush the puffed rice in a food processor, but don't bring it to the powder consistency - you want to keep that crunch.
7. Mix the rice with the hazelnut meal.
8. When the dacqouise is ready to be taken out of the oven, chop the chocolate and melt it in microwave for about 30 seconds, then stir and melt for another 30 seconds. Mix with the spatula until no chunks are left and all the chocolate is melted and uniform.
9. Add the hazelnut / rice mixture to the melted chocolate, mix well and spread over the dacqouise layer. Allow to cool to room temperature and refrigerate.
Cream Chantilly
10. Chop the chocolate, and add the Irish cream and the orange zest.
11. In a small sauce pan heat the cream until it almost boils. Pour the hot cream over the chocolate. Mix well with a whisk and leave in the refrigerator to cool.
12. When the mixture is cold, whip it with a mixer on high speed until it forms firm peaks. Spread cream Chantilly over the chilled base and refrigerate again for at least 2-3 hours.
13. Before preparing the ganache transfer the cake into freezer. It will make it a little firmer for easier release from the pan.
Chocolate Ganache
14. Coarsely chop chocolate.
15. Bring cream just to a boil over medium-high heat. Pour over chocolate, and add salt. Let stand for 10 minutes (don't stir -- doing so will cool the ganache too quickly, making it grainy).
16. Stir with a whisk until smooth and shiny to break up any pieces and emulsify cream and chocolate.
To finish
17. Remove the cake from the freezer, release the spring form pan and remove the parchment paper from the cake. It should come off cleanly and easily.
18. Place the cake on a serving plate and pour the ganache over it.
19. Refrigerate again until ready to serve.
Afterthoughts:
- This cake is heavenly. The dacquoise layer is a little chewy, then the crunchy chocolatey layer, then the fluffy Chantilly cream and all topped with the rich ganache. So much texture and so much chocolate in all its manifestations :-)
- I think chocolate and hazelnuts were made for each other. I have this theory that the real reason for the discovery of America by Columbus was to unite hazelnuts, native to Europe, with chocolate, native to America. All other traditional reasons that they give you at school, like exploration, trade, imperialism, etc, pale in comparison, when one thinks about the world without Nutella, Ferrero Rocher or cakes like this one. Don't you agree?
- I might try to add a little gelatin to cream Chantilly at some point to make it a little stiffer and mousse-like, but I am not completely convinced it's needed.
To Recipe...
Summary only...
Delicious Singaporean street food, that does not have any carrots :-). It's a steamed savory daikon cake, cut into pieces and fried with eggs.
Source: Adapted from Mummy, I Can Cook
Taste: 5 (out of 5)
Difficulty: 4 (out of 5)
Ingredients:
For the cake
- 1 large daikon (about 100 g), finely shredded
- 50 g fine rice flour
- 150 ml room temperature water
- 1/8 tsp sea salt
For frying
- one daikon cake from above
- 2 eggs
- 3 tbsp of sauerkraut (in absence of salted preserved radish (chai poh) from the original recipe)
- 4 cloves of garlic
- 2 tbsp of fish sauce
- 2 tbsp of vegetable or coconut oil for frying
- chili sauce to taste
- 2,3 green onions, chopped
Total: 2 servings
Directions:
It's better to make the radish cakes the day before, and cutting up and frying the day after.
1. Steam or cook on low heat the shredded daikon with 75 ml of water for about 30 minutes, or until the daikon is translucent. Let cool to room temperature.
2. Add the flour, the salt and the remaining water to the blanched daikon, and mix well. Pour into a shallow 8 inch baking pan and steam on high heat for 45 minutes. At this point the "cake" should be firm. This was not the case for me, so I baked it in the oven for another 30 minutes at 325F, until it finally solidified. Let the cake cool, cover with cling wrap to prevent drying and refrigerate overnight.
3. When ready to cook, cut into little cubes when it's fully cool, don't worry about ragged edges as these are the bits that get irresistibly crispy.
4. Pour the oil into the pan and heat it to med-high heat. Fry cake cubes until crispy around the edges. You can press on it with the spatula for maximum crispy edges.
5. Add the sauerkraut and the garlic, reduce the heat to medium and and fry till fragrant. Drizzle with fish sauce and chili. Spread everything around the pan.
6. Beat eggs and pour the mixture evenly over the radish cakes. Let set until the bottom is nicely browned, before flipping over and browning on the other side. To make it easier on yourself, just cut roughly into smaller portions with the sharp edge of your spatula before flipping. It's okay for the cake to be semi-falling apart, like scrambled eggs.
7. Finish with chopped spring onions.
Afterthoughts:
- This is really delicious, with the soft and crispy texture of the cake and the fish sauce flavors. It makes a perfect meal for any time of day and night.
- I might be doing something terribly wrong with making the steamed rice cake. So far I tried this recipe twice. The first time I just steamed the cake, and it was not firm at all, even after a night in the fridge. And then when I was frying it it turned into a mushy mess. The second time I bought brand new rice flour and used a more traditional steaming pan, but the cake was still too soft. So I went to my well known method of baking cakes and it worked. I guess I have to experiment more with steaming cakes. Any suggestions on this topic would be welcome.
- I love using saurkraut in Asian dishes - it's a wonderful Oriental ingredient ;-). It's really great in Chinese fried rice too, ads a lot of crunch.
To Recipe...
Summary only...
Crunchy no bake Nutella treats in 15 minutes.
Source: Adapted from Crunchy Fudgy Heart Bites on Cook Lisa Cook
Taste: 5 (out of 5)
Difficulty: 1 (out of 5)
Ingredients:
- 1/4 cup coconut oil (270 cal)
- 1/4 cup cocoa (50 cal)
- 1/4 cup Nutella (400 cal)
- 1/2 tsp. vanilla extract (5 cal)
- 1 cup ground walnuts (185 cal)
- 1 1/2 cups Rice Krispies (160 cal)
Total: 16 servings, 970 cal, 60 cal / serving
Directions:
1. In a food processor blend the coconut oil, cocoa, Nutella and vanilla extract until smooth. If your kitchen is hot and the coconut oil is liquid you can easily blend all these ingredients by hand in less than a minute.
2. Pour the mixture into a large bowl and stir in the ground walnuts and Rice Krispies.
3. Evenly scoop the mixture into a mini silicone muffin mold. Or in absence of one, with slightly wet hands roll small balls and place on a plate lined with parchment paper. Refrigerate until set.
4. If you used a mold, press the bottom of each muffin cup to release the bites. Keep refrigerated.
Afterthoughts:
- These cute desserts are really light and crunchy, and perfect for anyone who loves Nutella. And it only takes 15 minutes to make them and then 15 more minutes to wait until they set in the fridge.
- This recipe uses Nutella instead of peanut butter and honey in the original recipe. Maybe peanut butter is a little stickier than Nutella and the peanut butter bites end up a little firmer. My Nutella balls were very delicate. Maybe next time I will try adding a little peanut butter or sunflower butter or even date paste.
- It would be nice to put these on a stick and coat them with chocolate for Chocolate coated crunchy Nuteall pops. But I wanted to try them right away and did not have enough patience to melt the chocolate :-). Oh well, next time...
- This post was my SRC assignment. Just in case you don't know yet, SRC, or the Secret Recipe Club is a group of over a hundred food bloggers, who are assigned a "secret" blog each months. Then they choose a recipe from that blog, make it and post it on their own blog on a given reveal day. Then there is a big party, where you hop from one blog to another and check what everyone's been cooking. Lots of fun! And terrible for your diet ;-) I want to thank Amanda, Jane and April for making it all possible!
- Cook Lisa Cook, from which this recipe was adopted, is a wonderful blog. Lisa cooks with her charming sous-chef, Maisie, and they have lots of yummy recipes. When I was browsing the blog to choose a recipe for SRC, I put together a list of things to try, and I will be coming back for them: Lacy cheese crackers, Walnut Roca squares and Copycat KFC coleslaw
To Recipe...
Summary only...