AdSense Full Screen test

Tuesday, March 30, 2010

Lychee Mousse Cake

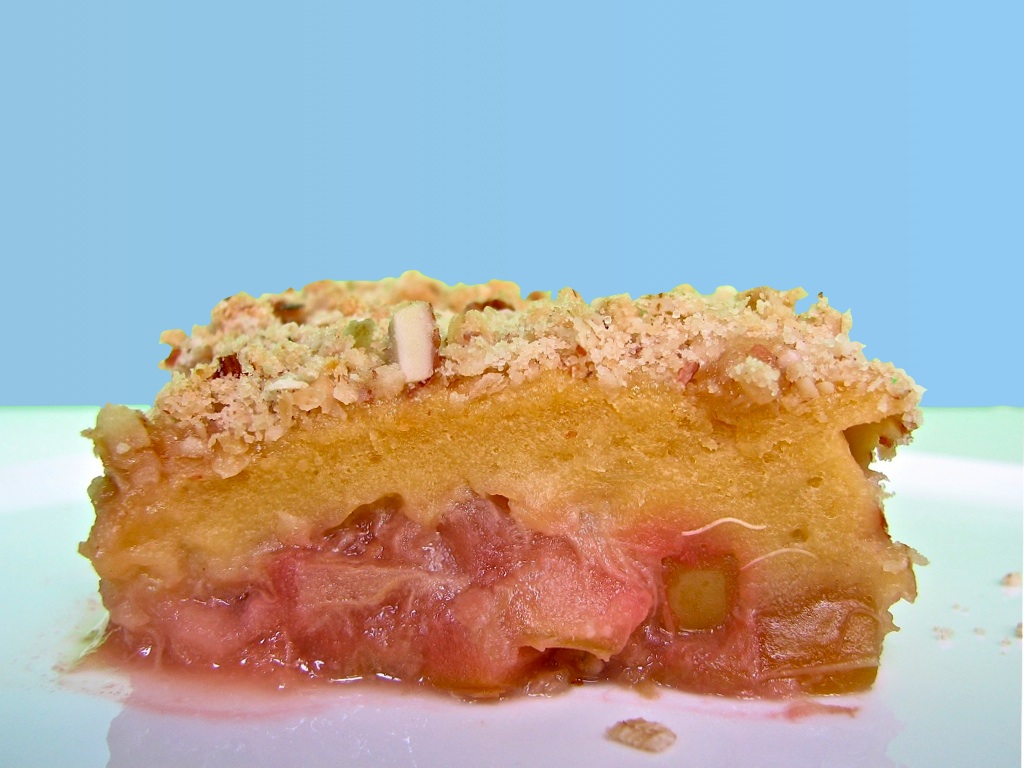
The lychee mousse is amazingly delicious, so this cake will taste great even when all the other components of are messed up :-)
Source
Adopted from Reader’s Digest “Baking with Love”, Raspberry Torte recipe
Taste 5 (out of 5)
Difficulty 3 (out of 5)
Ingredients
For the sponge
- 1/4 cup / 55 g caster sugar (215 cal)
- 1 tsp vanilla essence (10 cal)
- 2 eggs (140 cal)
- 1/2 cup / 60 g brown sugar (275 cal)
- 1/4 tsp baking powder
For the pastry
- 1 cup / 125 g all purpose flour (455 cal)
- 1/2 tsp baking powder
- 1/4 cup / 60 g butter (405 cal)
- 2 tbsp brown sugar (105 cal)
- 1 egg yolk (55 cal)
For chocolate layer and filling
- 1/3 cup / 50 g dark chocolate (245 cal)
- 2 1/2 cups / 300 g lychees (200 cal)
- 1 1/3 cups / 350 g non fat plain yogurt (180 cal)
- 1/5 cup / 50 ml lemon juice (15 cal)
- 1 tbsp / 14 g powdered clear gelatin
- 1 1/2 cups / 375 ml whipping cream (1100 cal)
For the glaze and decoration
- 10 strawberries (220 cal)
- 2 tbsp raspberry jam (70 cal)
- 1/2 cup lychee syrup (100 cal)
- 1/2 tsp powdered gelatin
Total 3790, 12 servings, 315 cal / serving
Instructions
1. Use 2 9-inch spring-form pans, or you can also get along with 1 if that’s all you got. Grease the base and side of one tin. Preheat the oven to 350F. 
2. For the sponge: beat the sugar, vanilla essence, eggs and 1 tsp cold water until fluffy. Mix flour and baking powder and sift over the egg mixture. Fold in with a whisk. Spread the sponge mixture in the greased tin. Bake for 20-25 minutes. Remove the tin from the oven, loosen the sides with a knife and open the spring-form. Turn sponge layer onto parchment paper or a silicon mat. Do not remove the base of the tin. Let the sponge cool.
3. For the pastry: combine all the ingredients in a bowl, knead into a smooth dough. Shape into a ball, press flat, wrap in cling wrap and chill for 30 minutes. Grease base of the second spring-form tin. Roll out pastry to line base of tin and prick several times with a form. Bake for 12-15 minutes. Remove from the oven, cool on a wire rack. Remove from the tin.
4. For the chocolate layer: melt chocolate in a bowl of simmering water (or in a microwave) and spread over cooled pastry base. Remove base of the tin and baking paper of the pastry base with top facing downwards. Place a cake ring around the pastry and the sponge. 
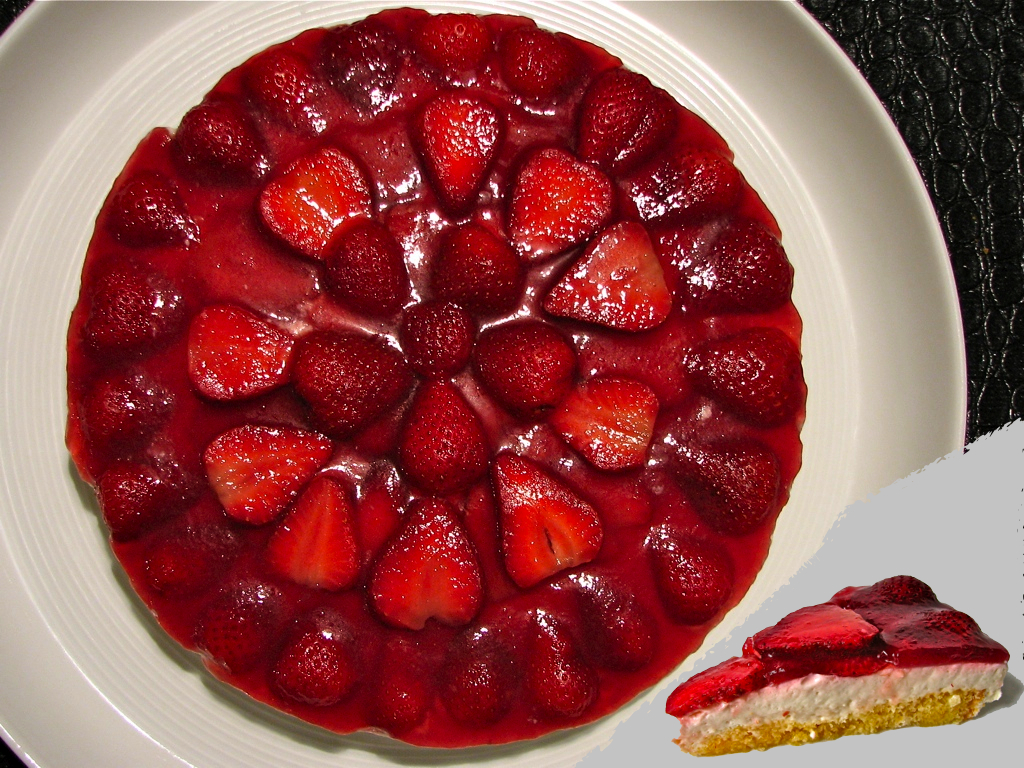
5. For the filling: puree the lychees, combine with sugar, yogurt and lemon juice. Sprinkle the gelatin over 1/4 cup of warm water in a small saucepan. Stir over a low heat until dissolved. Stir into the lychee  mixture. Beat the cream until stiff. As soon as the lychee mixture begins to set, stir in the cream and pour onto the sponge base, smooth the top. Allow to set in the fridge for 1 1/2 hours.
6. Cut the strawberries into 3-4 slices lengthwise. Soak them in the lychee syrup, especially if they are not very sweet. 
7. For the glaze: combine lychee syrup with jam, place in a small sauce pan and bring to a boil. Remove from the heat and pour the mixture through a fine sieve (if the jam has seeds). Mix the gelatin with 2 tbsp of warm water, and then add to the hot glaze. 
8. Arrange the strawberries on top of the lychee mousse. When the glaze has cooled a little, pour it over the strawberries. Chill in the refrigerator for 1 more hour. 
9. When the cake is firm, loosen the cake with a sharp knife and gently remove the ring.
Afterthoughts
- Most of the steps in this recipe did not turn out as I expected, even though I followed them quite precisely, but the lychee mousse was so good, that I really think this cake tastes 5 out of 5. 
- What went wrong? First, the pastry layer is very flaky. It seems to be suited for a crumble - it is absolutely impossible to roll. I would think that you need to add cold water to it, to make it a little more flexible, but the recipe did not ask for it, so I did not have water, and could not roll out the pastry. I simply pressed it to the tin with the fingers. And then when I tried to remove it it cracked, in so many places, that it was absolutely impossible to glue them together. So I had to discard the pastry layer :-).
- Then the sponge was too soft to serve as a base. It also got stuck to the tin and was torn in the middle, but I just put the torn part back in and the moisture from the mousse glued it up. But overall, the sponge was not spongy enough to absorb all the mousse, but not hard enough to be a base. I would use more flour next time.
- The lychee layer tasted wonderful! Texture-wise, I would add a little more gelatin, and wait until it’s semi solid to pour it out (I poured it when it was still too liquid). In the original recipe, it was supposed to be a raspberry mousse, which probably would have tasted great too.
- The glaze was just as you would expect this type of glaze to be.
- This is a cook book of trial and error, this recipe certainly fits both the trial and the error categories :-).

To Recipe...

Saturday, March 27, 2010

Apple Rhubarb Clafoutis Crumble

Want something soft, crunchy, tart and sweet, that would be low calorie too? Try this Apple Rhubarb Clafoutis Crumble.
Source
Improvised
Taste 5 (out of 5)
Difficulty 2 (out of 5)
Ingredients
For the clafoutis
- 2/3 cup all-purpose flour (300 cal)
- 1/2 cup brown sugar (270 cal)
- 2 large eggs (140 cal)
- 2/3 cup low fat milk (80 cal)
- 1/2 tsp almond extract
For the fruit filling
- 3 medium apples (210 cal)
- 2 stalks rhubarb (20 cal)
- 1/2 cup orange juice (65 cal)
- 1 tbsp lemon juice
- 2 tbsp brown sugar (70 cal)
For the crumble
- 1/2 cup oats (120 cal)
- 1/4 cup all purpose flour (110 cal)
- 1 oz/ 30 g almonds, chopped (175 cal)
- 1 oz/ 30 g brown sugar (115 cal)
- 1 oz/ 30 g cold butter (215 cal)
Total 1890 cal, 12 servings, 160 cal/serving
Instructions
1. For the filling: chop the apples and the rhubarb into 1/4 inch cubes. In a medium sauce pan cook the fruit with the orange juice for about 10 minutes over low-medium heat stirring occasionally, until the fruit softens. Add 2 tbsp of brown sugar and mix well.
2. For the clafoutis batter: beat the eggs on high speed with an electric mixer for about 5 minutes until the eggs triple in volume. Add the remaining ingredients all at once and beat until all the flour is incorporated and the batter is smooth.
3. Preheat the oven to 375F. Grease a 9x7 inch baking sheet and spread the fruit evenly over the bottom. Pour the clafoutis mixture over the fruit. Bake for 10 minutes.
4. For the crumble: Mix all the ingredients using pastry cutter. If there are still lumps, crumble them with your fingers. Remove the baking sheet from the oven, sprinkle the crumble evenly on top of the batter and bake for 25 more minutes. Let cool slightly before serving.
Afterthoughts
- I’ve been thinking for a while about making an apple rhubarb crumble and about making clafoutis. It was really hard to choose between the two, so I combined them and it turned out pretty good, in terms of both the flavor and the structure. 
- In the calorie-saving spirit, the clafoutis layer has no butter at all - the fat comes only from the low fat milk and eggs. And the taste is great - I will not be adding butter to my clafoutis any more.

To Recipe...

Thursday, March 25, 2010

Creamy Cauliflower Soup

Warm up those rainy spring days when it feels like winter is back. A healthier simpler version of a creamy soup for only 75 calories.
Source
Improvised
Taste 4 (out of 5)
Difficulty 1 (out of 5)
Ingredients
- 1 small cauliflower (70 cal)
- 2-3 green onions (5 cal)
- 1 garlic clove (5 cal)
- 1/2 tbsp canola oil (60 cal)
- 1 tbsp shiro miso paste (30 cal)
- 1 cup low fat milk (130 cal)
- 1.5 cups water
- 2 tbsp fresh parsley, finely chopped
- salt and black pepper to taste
Total 300 cal, 4 servings, 75 cal/serving
Instructions
1. Mince the garlic, finely chop the green onions and saute them with 1/2 tbsp of oil for about 5 minutes on low-medium heat. 
2. Add the cauliflower flowerets.  Dissolve the shiro miso paste in 1 1/2 cups of water and add to the vegetables. Let cook over medium heat for about 30 minutes. 
3. Transfer the vegetables with some of the liquids into a blender or a food processor and puree. 4. Return to the sauce pan. Add 1 cup of milk, parsley, salt and pepper. Bring to a boil and then let simmer for 5 minutes. 
Afterthoughts
- You don’t necessarily need flour, starch and heavy cream to make the soups creamy. This version is light, gluten free and only uses 1 cup of low fat milk. And the creaminess comes from the vegetable, the pureed cauliflower. Much simpler to make, much healthier to eat.
- In the picture served with Zucchini Bread.

To Recipe...

Zucchini Bread

This Z is not for Zorro, it’s for the moist and crunchy Zucchini Bread ;-)

This recipe is featured on RecipeNewZ

RecipeNewZ - great recipes, desserts, mains, cooking, baking
Source
Inspired by the Artisan Bread in 5 Minutes a Day
Taste 4 (out of 5)
Difficulty 1 (out of 5)
Ingredients
- 1 medium zucchini (30 cal)
- 1 garlic clove, roasted (5 cal)
- 1 tbsp olive oil (120 cal)
- 1/4 cup rye flour (100 cal)
- 3 cups white all purpose flour (1365 cal)
- 3/4 tbsp yeast
- 1/2 tbsp salt
- 1 cup of water (should be 1 1/2 cups of liquids total combined with the zucchini juice)
Total 1620 cal, 2 1-lb loaves, 820 cal/loaf
Instructions
1. Mince the roasted garlic. Wash and roughly grate the zucchini, do not peel. Squeeze the juice from the grated zucchini and pour into a measuring cup. Add water so that the total amount of liquids is 1 1/2 cups. Ideally, you might want to add water so that the resulting temperature of the liquids will be between 90F and 100F, but it’s not necessary. Don’t use water that is too hot - liquids warmer than 100F might kill your yeast.
2. In a large container that has a lid, using a wooden spoon mix all the ingredients until all the flour is incorporated. Cover the container (not airtight) and let on the kitchen counter for about 2 hour until the dough approximately doubles in size. 
3. Use the dough after the 2 hour rest or refrigerate it in the same container still covered (not airtight). The refrigerated dough can be used over the next 10 days. 
4. On the baking day, sprinkle the dough with flour to prevent sticking and cut the desired amount. I use half of the dough at a time to make a 1-lb loaf. Gently form a ball by stretching the surface of the dough around to the bottom on all four sides, rotating the ball a quarter-turn as you go. Place the ball on a cornmeal or semolina coated pizza peel. If you do not use a baking stone, place the bread on a cookie sheet which will be used for baking. Let the loaf rest for about 90 minutes (or 40 minutes if using non-refrigerated dough).
5. Place an empty broiler tray in the oven where it will not interfere with the rising of your bread.   About 30 minutes before baking preheat the oven with the broiler tray and the baking stone to 450F. If you do not use the stone, the preheat will be shorter.  
6. Right before baking slash the top of the loaf with a serrated knife (in a Z pattern :-) ). Slide the bread onto the stone, if using, or simply place the cookie sheet into the oven. Pour 1 cup of hot (not boiling) tap water into the broiler tray - be very careful here: the tray is hot and there will be a lot of steam.  Avoid splashing the water on the oven glass door (the glass might crack).
7. Close the oven door as soon as possible to trap the steam inside. Bake for about 45 minutes until the bread is nicely browned. Remove from the oven and let cool on a rack. 
Afterthoughts
This crumb is very moist and soft thanks to zucchini. But I had some quite large chunks of zucchini left in the bread, especially the skin, which I did not manage to grate well; and I don’t think I like this fact too much. Maybe I’ll get used to it or maybe next time I’ll grate the zucchini in a food processor.

To Recipe...

Wednesday, March 24, 2010

Apple Buns

A mild apple aroma will be with you from the moment you mix the dough until you finish your last bite of this absolutely delicious bun. And it’s only 160 calories. A perfect treat for a weekend brunch.
Source 
Inspired by the Artisan Bread in 5 Minutes a Day. 
Taste 5 (out of 5)
Difficulty 1 (out of 5)
Ingredients
- 2 1/2 cups all purpose flour (1140 cal)
- 1/4 cup whole wheat bread flour (110 cal)
- 1/2 cup ground oats (160 cal)
- 1 large apple (80 cal)
- 2 tbsp honey (130 cal)
- 1/4 cup maple syrup (210 cal)
- 2 tbsp apple vinegar (5 cal)
- 2 tbsp sunflower seeds (95 cal)
- 3/4 tbsp yeast
- 1/2 tbsp salt
- 1 cup water at 90-100F
Total 1930 cal, 12 buns, 160 cal / bun
Instructions
1. Wash the apple, discard the seeds, do not peel. Finely chop it a puree in a food processor. 
2. In a large container that has a lid, using a wooden spoon mix all the ingredients until all the flour is incorporated. Cover the container (not airtight) and let on the kitchen counter for about 2 hour until the dough approximately doubles in size. 
3. Use the dough after the 2 hour rest or refrigerate it in the same container still covered (not airtight). The refrigerated dough can be used over the next 10 days. 
4. On the baking day, sprinkle the dough with flour to prevent sticking and cut the desired amount. I use half of the dough at a time to make 6 buns. Each bun should be a size of a large plum. Dust it with flour and gently form a ball by stretching the surface of the dough around to the bottom on all four sides, rotating the ball a quarter-turn as you go. Place the buns on a cornmeal or semolina coated pizza peel leaving 2 inches between the buns. If you do not use a baking stone, place the buns on a cookie sheet which will be used for baking. Let the buns rest for about 50 minutes (or 30 minutes if using non-refrigerated dough).
5. Place an empty broiler tray in the oven where it will not interfere with the rising of your buns.   About 30 minutes before baking preheat the oven with the broiler tray and the baking stone to 450F. If you do not use the stone, the preheat will be shorter.  
6. Right before baking you can brush the tops of the buns with an egg white wash made from 1 egg white lightly beaten with 1 tsp of sugar - this will make the buns shinier. Slide the buns onto the stone, if using or simply place the cookie sheet into the oven. Pour 1 cup of hot (not boiling) tap water into the broiler tray - be very careful here, the tray is hot there will be a lot of steam.  Avoid splashing the water on the oven glass door (the glass might crack).
7. Close the oven door as soon as possible to trap the steam inside. Bake for about 25 minutes until the buns are nicely browned. Remove from the oven and let cool on a rack. 
Afterthoughts
- A lovely, a little bit sweet bread with a mild apple flavor. It’s simply wonderful when eaten warm and fresh with butter and your favorite jam or apple puree. 
- My favorite thing about this bread is that it’s extraordinarily satisfying - I find it really tasty, but I am perfectly happy with one bun and don’t crave the second one right away (which is very rare for me). So for 160 calories (ok, 260 with jam and butter), it’s a great deal. 
- This bread is inspired by the Barley Apple Bread from the Healthy Bread in 5 Minutes a Day. However, I’ve made a lot of changes. First of all, my recipe primarily uses all purpose flour (because I like it much more than the whole wheat and it rises better). Then I used oats instead of barley (when I made this recipe with barley it was tasty, but very heavy). Lastly, I added sunflower seeds. 

To Recipe...

Tuesday, March 23, 2010

Turkey Moussaka

A classic Greek recipe with healthy low calorie substitutions and the same great taste.
Source 
Improvised
Taste 4 (out of 5)
Difficulty 3 (out of 5)
Ingredients
- 2 large eggplants (220 cal)
- 4 tbsp canola oil (480 cal)
- 500 g extra lean ground turkey (550 cal)
- 1 medium onion (60 cal)
- 2 garlic cloves (10 cal)
- 1/2 cup tomato juice (20 cal)
- 2 tbsp tomato paste (20 cal)
- 1/2 cup roughly chopped parsley
- 1 bay leaf
- 50 g bread crumbs (200 cal)
- 2 eggs (140 cal)
- 4 tbsp low fat cottage cheese (60 cal)
- 40 g gruyere cheese, roughly shredded (170 cal)
- 30 g feta cheese, crumbled (100 cal)
- nutmeg, dried dill, dried basil, salt and black pepper to taste
Total 2030 cal, 6 servings, 340 cal/serving
Instructions
1. Peel and cut the eggplants lengthwise into 1/2 inch thick slices. Sprinkle both sides of each slice with salt and let stand for 1/2 an hour. Then rinse the eggplants to remove the salt. This step is suppose to remove the bitterness from the eggplants. 
2. Roughly chop the onion, crash the garlic and cook them with 1 tbsp of oil in a large frying pan until the onion caramelizes (about 15 minutes). Remove the onion from the heat and move to a blender. Add one more tablespoon of oil to the pan and saute the ground turkey over medium heat for about 10-15 minutes until it starts to brown. 
3. Puree the onion and the garlic in a blender. Roughly chop the parsley. Add the pureed onion, parsley, tomato paste, tomato juice, bay leaf and salt and pepper to taste to the turkey. Season with salt and pepper to taste. Stir well, reduce the heat to low, cover with a lid and cook for about 20 minutes. Then discard the bay leaf.
4. Brush each side of the eggplant with a little bit of oil (use 2 tbsp of oil for 2 eggplants) and grill them under the broiler for about 3 minutes on each side (you might need to do this in batches). Place the grilled eggplants on paper towels to absorb excess oil. 
5. Preheat the oven to 350F. Grease a 9x7 inch baking dish and sprinkle with a 1/4 of the bread crumbs. Place half of the eggplant slices over the bread crumbs. They might overlap slightly. 
6. Beat 2 eggs lightly. Mix about 2/3 of the eggs with the beef and the remaining bread crumbs and spread on top of the first eggplant layer in the baking dish. Cover with the second half of the eggplants. 
7. Mix the remaining eggs with the cottage cheese, half the feta cheese and half the gruyere. Season with nutmeg, dried dill and basil and spread over the second eggplant layer.
8. Bake for about 20 minutes. Then sprinkle the remaining feta and gruyere on top and bake for 15 more minutes. Let cool for 10-15 minutes before serving. 
Afterthoughts
- The moussaka turned out quite good. I actually used only 2/3 of the turkey-onion mixture and reserved the other 1/3 for meat-stuffed parathas, that I’ve been planning to make for a while. And that saved me 60 calories per serving. 
- Many of the moussaka recipes want you to use beef, fry the eggplants and then add the creamy béchamel sauce. Such moussaka can cost you up to 800 calories per serving. So I think my turkey-cottage cheese substitution with 340 calories is a pretty good deal.
- Do not add too much salt to the eggplant - it might take out the bitterness, but you could end up with very salty eggplants. 
- Most of the moussaka recipes call for pine nuts. I did not have them, and instead I sprinkled the ready moussaka with pistachios (somehow I associate them with the Mediterranean region, so I thought it fits the spirit of the dish). 

To Recipe...

Monday, March 22, 2010

Peach Mousse Rolled Cake

A great soft, melt-in-your-mouth mousse cake for only 240 calories :-).
Source 
Mousse from the Chifond blog; cake adapted from “Baking” by James Peterson
Taste 4 (out of 5)
Difficulty 3 (out of 5)
Ingredients
For the Moist Sponge cake
- 1 tsp vanilla extract (10 cal)
- 1/2 tsp baking powder
- 1/4 cup low fat milk (30 cal)
- 2 tbsp butter (210 cal)
- 4 large eggs (280 cal)
- 3/4 cup brown sugar (410 cal)
- 3/4 cup all purpose flour (340 cal)
For the peach mousse
- 300 g canned peaches - about 200 g peaches and 100 g juice from the can (130 cal)
- 50 g brown sugar (190 cal)
- 1 cup heavy whipping cream (820 cal)
- 1 tbsp unflavored gelatin 
- 1/4 cup lukewarm water
Total 2420, 10 servings, 240 cal/serving
Instructions
For the cake
1. Line an 11x17 inch sheet pan with parchment paper. Make sure the sides are also covered with parchment, it will be much easier to remove the cake. Preheat the oven to 400F. 
2. Combine the vanilla, milk and butter in a small saucepan, bring to a simmer and cook until the butter melts. Remove from the heat and set aside. 
3. Beat the eggs with the sugar for about 5 minutes with an electric mixer until the mixture is about tripled in size. 
4. Pour the milk-butter mixture into the eggs and fold quickly but gently. Sift in the flour and mix well, the flour especially tends to accumulate at the bottom of the bowl. Make sure it’s all incorporated. 
5. Pour the batter into the lined sheet pan and bake for about 12-13 minutes until slightly golden. 6. Remove the pan from the oven, let it cool for about 10 minutes and then carefully peel the parchment paper from the surface of the cake. 
For the mousse
7. Reserve about 2-3 peach slices and 2-3 tbsp of juice. Puree the remaining peach, juice and the sugar in a blender until smooth. Chop the reserved peach into small cubes and add to the puree. 
8. Sprinkle gelatin on water, let it sit for 3 min to become spongy, and then add the gelatin water to the puree, pour into a small sauce pan and bring to a boil over medium heat, stirring occasionally. Remove from the heat and let cool for about 5 minutes. 
9. Beat the whipping cream with electric mixer at medium speed until fluffy but still can flow a bit (like smoothies). It might be easier with an ice bath, especially in summers.
10. Combine whipped cream with cooled peach juice mixture.
To assemble the cake
11. Brush the cake with the reserved 2-3 tbsp of peach juice to prevent it from cracking when you roll it. Leave it to soak for about 10 minutes. 
12. Spread the peach mousse over the cake with an offset spatula. The mousse should still be liquid. Reserve about a 1/3 of the mousse to pour over the top of the cake. 
13. Starting from the short end, roll the cake, leaving the seem at the bottom of the cake. Pour the remaining mousse over the cake. Place in the refrigerator to set for at least 2-3 hours.
14. Once the cake is chilled you can also melt a little bit of dark chocolate in the microwave and drizzle over the top.
Afterthoughts
- Texture wise: an absolutely soft and light cake. Great for the kids. 
- Taste wise: a little bit bland. It would be great to add some peach liquor or at least orange or lemon extract to the mousse. But I did not have the liquor and did not think about the extract. That’s why there is the next time.
- All in all, I was never a huge fan of rolled cakes, but they have one big advantage over the round cakes: they take so much less space in the fridge :-).
- I had about 1/2 a cup of mousse left. I did not want to flood the cake, so I made 2 individual mousse servings.

To Recipe...

Sunday, March 21, 2010

A Little Bit of Everything Multigrain Bread

This hearty rustic multigrain bread is bursting with flavors and health. And it’s of the easy, no knead, 5 minutes a day variety.  
Source 

Taste 5 (out of 5)
Difficulty 1 (out of 5)
Ingredients
- 1/4 cup oats (160 cal)
- 2 tbsp flax seeds (110 cal)
- 2 tbsp sunflower seeds (100 cal)
- 1 tbsp cumin seeds (25 cal)
- 1/4 cup rye flour (100 cal)
- 1/4 cup buckwheat flour (140 cal)
- 2 1/4 cups all purpose flour (1025 cal)
- 1/2 tsp dried basil
- 1/2 tsp dried dill
- 3/4 tbsp active dry or instant yeast
- 1/2 tbsp salt
- 1 1/2 cups water at 90-100F (a little warmer than the body temperature)
Total 1660 cal, 1 2-lb loaf
Instructions
1. In a large container that has a lid, using a wooden spoon mix all the ingredients until all the flour is incorporated. Cover the container (not airtight) and let on the kitchen counter for about 2 hour until the dough approximately doubles in size. 
2. Use the dough after the 2 hour rest or refrigerate it in the same container still covered (not airtight). The refrigerated dough can be used over the next 14 days. 
3. On the baking day, sprinkle the dough with flour to prevent sticking and gently form a ball by stretching the surface of the dough around to the bottom on all four sides, rotating the ball a quarter-turn as you go. Elongate the ball with your hands and place the dough into a greased 8x4x3 inch loaf pan. Let it rest for about 1 hour 40 minutes (or 60 minutes if using non-refrigerated dough).
4. Place an empty broiler tray in the oven where it will not interfere with the rising of your bread.  About 20 minutes before baking preheat the oven with the broiler tray to 450F. Since you are using a loaf pan, baking stone is not necessary. 
5. Slash the top of the loaf with a serrated knife. It might be helpful to dip the knife in water, to prevent it from sticking to the dough. Place the loaf pan into the oven. Pour 1 cup of hot (not boiling) tap water into the broiler tray - be very careful here, the tray is hot there will be a lot of steam.  Avoid splashing the water on the oven glass door (the glass might crack).
6. Close the oven door as soon as possible to trap the steam inside. Bake for about 30-35 minutes until the bread is brown and firm. Remove the loaf from the oven and from the pan and let cool on a rack. 
Afterthoughts
- This bread is really loaded with flavors, caraway seeds giving the predominant one. 
- It’s a substantial, healthy, rustic loaf that goes well with stews and soups. It’s also perfect for a sandwich with roast beef, pickles and sauerkraut.  
- Feel free to use other flours / seeds that you have available or like more. As long as the proportion of white flour to whole grains is no more than 2:1 you can use this method. If you're using more whole grains, you might want to add gluten.

To Recipe...

Saturday, March 20, 2010

Pistachio Mousse with Rose Scented Strawberries

This light and flavorful dessert is a great way to celebrate the spring. 
Source
Adapted from Nordljus

Taste 5 (out of 5)
Difficulty 2 (out of 5)
Ingredients
- 30 g pistachios (170 cal)
- 20 g confectioners’ sugar (75 cal)
- 140 g whipping cream (480 cal)
- 220 ml low fat milk (115 cal)
- 1 egg (70 cal)
- 60 g sugar (230 cal)
- 1/2 tsp gelatin
- 1/4 cup lukewarm water
- 10 strawberries (220 cal)
- 1 tsp brown sugar (15 cal)
- 2 tbsp rose water
Total 1375 cal, 6 servings, 230 cal / serving
Instructions
1. Lightly whip the double cream and keep in the fridge. 
2. Whiz the pistachios in a food processor until very fine, add the confectioners’ sugar and blend in. Add the milk to the pistachio paste, mix well, and bring to the boil in a small saucepan. 
3. In a bowl, whisk the egg and the sugar until pale. Stir the warm milk mixture in, then put back in the pan and stir on a medium heat until the custard thickens and you can see a trail as you whisk. Strain through a fine sieve into a clean bowl.
4. Dissolve the gelatin in 1/4 cup of lukewarm water. Then add to the hot custard and mix well. 5. Gently fold the whipped cream into the mixture with a spatula. Pour into the serving dishes or molds and let set in the fridge for about 2 hours.
6. Finely chop 10 strawberries, toss with sugar and rose water and let stand for half an hour. Serve with the pistachio mousse.
Afterthoughts
- I love it: great combination of flavors, great texture, great colors. 
- If I had to change 1 thing, I’d like it to have less calories :-). Maybe next time I can use whipped egg whites instead of cream... 

To Recipe...