AdSense Full Screen test

Wednesday, March 30, 2011

Hazelnut Raspberry Mousse Cake

Pure delightful moist tangy sweet amazingness
Source: Cake adapted from “Celebration Cakes” by The Australian Women’s Weekly, Hazelnut Berry Delight; Raspberry mousse adapted from Bakers Royale blog; Chocolate Chantilly from “Chocolate - more than 50 decadent recipes” by Dominique and Cindy Duby.

Taste:
6 (out of 5)

Difficulty: 5 (out of 5)

Ingredients

For the cake (2575 cal)
- 125 g butter, chopped (895 cal)
- 1 cup icing sugar (775 cal)
- 3 eggs (210 cal)
- 1/4 cup self – rising flour (110 cal)
- 1/2 cup hazelnut meal (345 cal)
- 75 g sour cream (160 cal)
- 150 g fresh or frozen raspberries (80 cal)
For the mousse (830 cal)
- 3/4 cup whipping cream (615 cal)
- 1 1/2 cups / 150g frozen raspberries (80 cal)
- 1/4 cup brown sugar, not packed (135 cal)
- 1 packet / 7g gelatin
- 3-4 tbsp cold water
For chocolate Chantilly (550 cal)
- 0.9 oz/ 25 g 70% dark chocolate, finely chopped (140 cal)
- 1/2 cup / 250 ml whipping cream (410 cal)
Total: 6 inch round cake, 3955 cal, 8 servings, 495 cal / serving

Instructions

For the cake
1. Grease a deep 6 inch / 17 cm cake pan, line the base and sides with parchment paper.
2. Beat butter and sugar with an electric mixer until light and fluffy. Add eggs, one at a time, beating until just combined between additions (mixture may curdle at this stage). Sift in sifted flour, hazelnut meal, sour cream, raspberries and blackberries.
3. Bake the cake at 350F for about an hour until a toothpick inserted into the center comes out dry. Let the cake rest in the pan for 5 minutes before removing onto the wire rack to cool.
For the raspberry mouse
4. Sprinkle gelatin over cold water and let it bloom for 20-30 minutes until you prepare the raspberries.
5. Heat raspberries with the sugar in a small saucepan; let simmer for 10-15 minutes. Puree warm simmered raspberries in a food processor. Push puree through a fine mesh strainer to remove seeds. Set aside.
6. Whip heavy cream until soft peaks form.
7. Warm up the blooming gelatin in a microwave for 10 seconds until the gelatin melts. Mix well and pour into the raspberry puree mixture. Whisk until mixture thickens to syrup consistency. Fold raspberry gelatin mixture into soft peaked cream.
For the assembly
8. Cut the cake horizontally into 3 parts (this is called "torting" the cake). Here are my tips on how to cut perfectly horizontal layers without any special equipment.
9. Line the sides of a 6 inch spring-form pan with parchment paper. Place the lower layer of the cake into a spring-form pan, pour a third of the raspberry mousse on top and spread evenly. Repeat with the remaining 2 layers. Leave the cake in the refrigerator until the mousse sets completely. It might take an hour or two.
For the chocolate Chantilly
10. Bring whipping cream to a boil in a saucepan. Pour the boiling cream on top of the chocolate and mix well until combined and uniform. Let cool in the fridge; overnight is best, but several hour would also work.
11. Once cool, whip with an electric mixer until medium peaks.
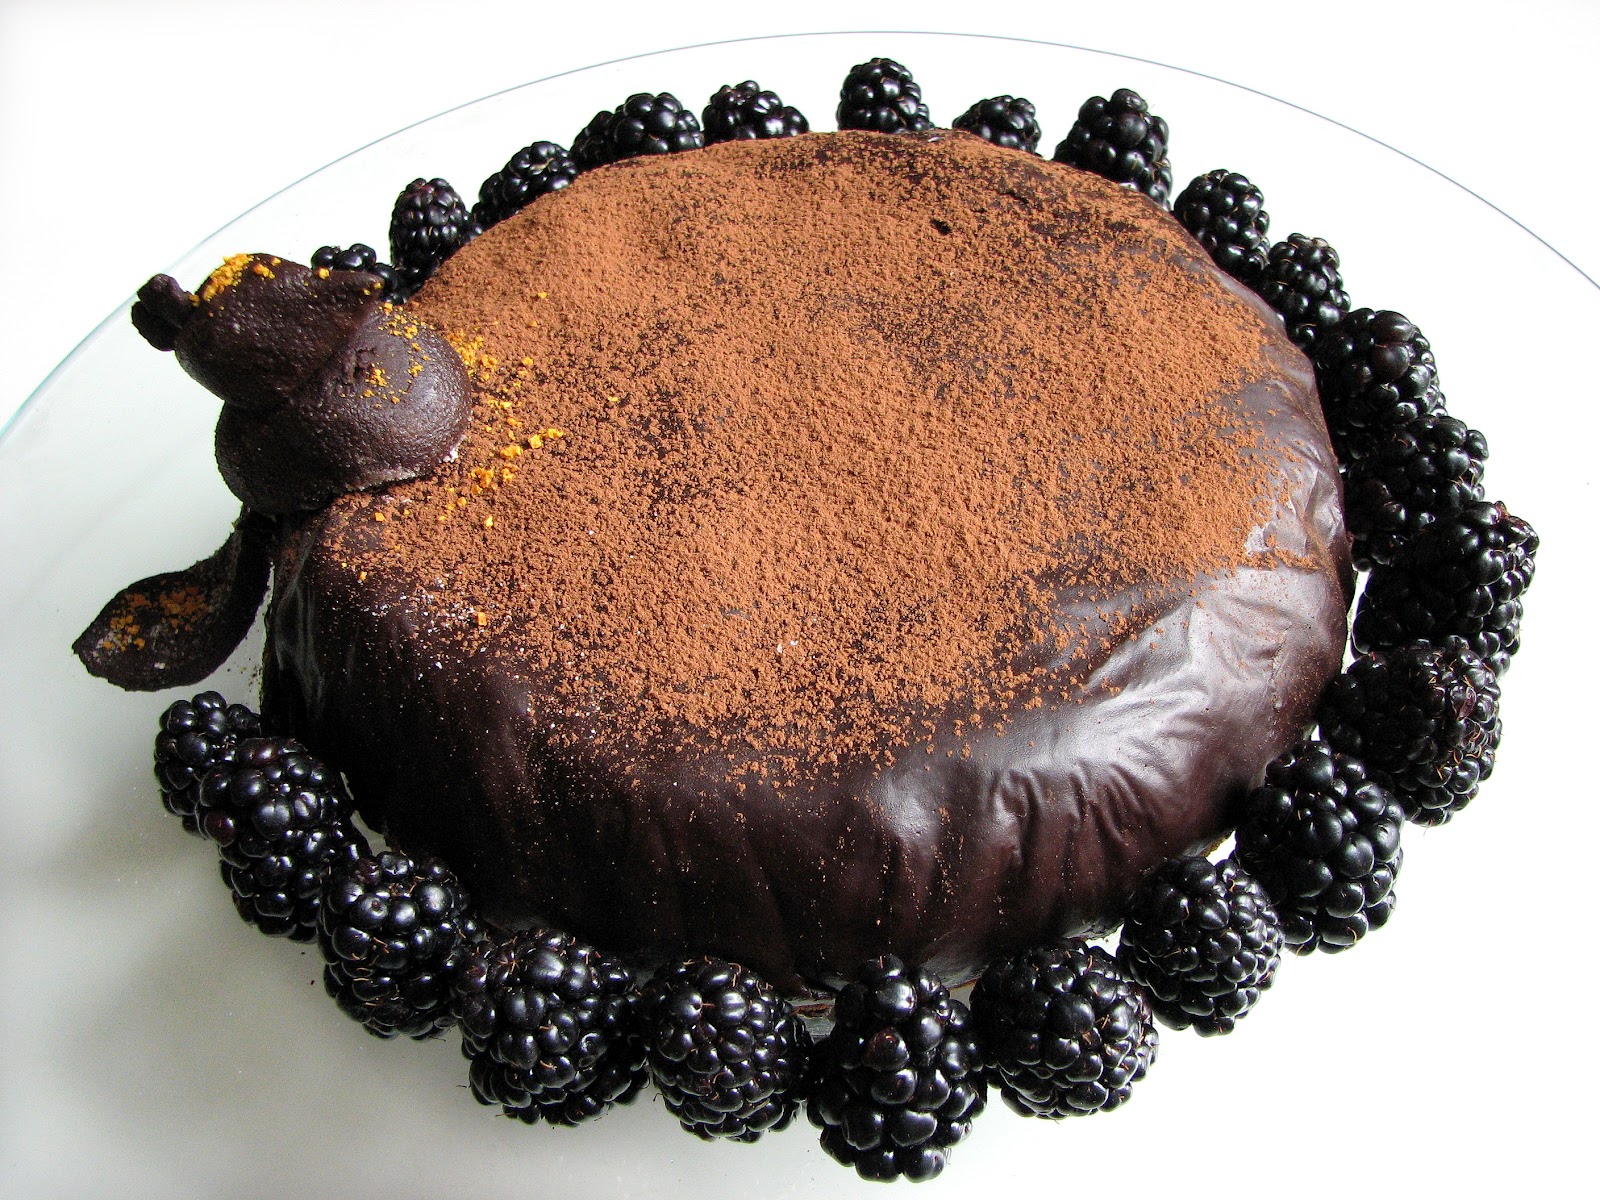
12. Remove the set cake from the spring-form pan, carefully peel off the parchment paper off the sides of the cake. Spread cream Chantilly in a thin layer over the sides and the top of the cake. Refrigerate for one more hour.

Afterthoughts
1. This cake tastes absolutely amazing. It is so soft, moist, has a slight hazelnut flavor, hint of sour from the raspberries, a tiny bit of bitterness from the chocolate Chantilly, and all these combine in a perfect melting in your mouth bliss. I will certainly be making it again.
2. The cake turned out very tall, much higher than I expected, about 3 inches – I was lucky to have a tall spring-form pan, otherwise it might have turned out into a huge muffin :-). I prefer lower cakes, so next time I will use half of the amount in this recipe and shorten the bake time. This will give 2 layers, and would use 2/3 of the raspberry mousse. I will keep the same amount of the chocolate Chantilly though, because it was barely enough this time. I had to literally scrape the bottom of the bowl ;-).

To Recipe...

How to divide a cake into perfect horizontal layers

"Torting" = cutting the cake horizontally to create layered cakes.
Making layered cakes has always been an insurmountable challenge for me: I could never tort a cake. The knife would always go at an angle and I would end up with clumsy scraps of cake. I tried many things: putting toothpicks in the cake to mark where it should be cut, using dental floss or a Wilton cake leveler – they just would not cut it for me ;-).
And then one sleepless night I came up with a method that so far had produced 3 perfectly torted cakes. And the best thing was: I did not need to buy any specialized equipment.

What you need:
- A baked cake
- One container with straight level walls that the cake can fit into (can be a cake pan, in which the cake was made)
- Several flat plates / coasters that fit into the container to support and elevate the cake
- A sharp knife with a blade longer than the width of your container

In my case I used a 6 inch cake, a 7 inch plastic food storage container, three 7 inch round cork coasters and an 8 inch chef’s knife.

What you do:

1. Gently mark with the knife place on the side of the cake where it should be cut.
2. Put the needed amount of support (coasters / plates / cardboard) into the container, so that when the cake is placed on the support the cutting mark will be exactly at the level of the container walls. The cake should be stable and parallel to the container floor.
3. Hold the top of the cake with one hand, to hold the cake in place. With the other hand cut the cake so that the knife is supported by the container walls both near the handle and near the tip. Make slow steady sawing motions with the knife, making sure it at all times lies flat on the container walls.
4. Voilà!

And this is the link to the recipe of the Hzelnut Raspberry Mousse cake in the photos.

To Recipe...

Sunday, March 27, 2011

Meringue Coffee Cake with Chocolate Filling

Yummy, comforting, yeasty goodness for the March 2011 Daring Bakers’ Challenge
Source: Adapted from The Daring Bakers’ Challenge March 2011 hosted by Ria and Jamie

Taste: 5 (out of 5)

Difficulty: 4 (out of 5)

Ingredients

For the yeast coffee cake dough
- 2 cups all-purpose flour (910 cal)
- 1/4 cup sugar (195 cal)
- 1 tsp active dry yeast
- 1/4 cup 2% fat milk (30 cal)
- 2 tbsp water
- 1/4 cup Becel margarine at room temperature (430 cal)
- 1 large egg at room temperature (70 cal)
For the meringue
- 2 large egg whites at room temperature (30 cal)
- pinch of salt
- 1/4 tsp vanilla extract
- 1/4 cup sugar (195 cal)
For the filling
- 1/2 cup unsweetened cocoa powder (100 cal)
- 1/2 cup brown sugar, not packed (275 cal)
- 1/2 cup unsalted butter, melted (860 cal)
For egg-wash
- 1 beaten egg-white with a tsp of sugar (30 cal)
Total: 1 round (10’’ coffee cake), 12 servings, 3125 cal, 260 cal / serving

Instructions

For the dough
1. In a large mixing bowl, combine the sugar, salt and yeast with 1/2 of the flour.
2. In a saucepan, combine the milk, water and margarine and heat over medium heat until warm and the margarine is just melted.
3. With an electric mixer on low speed, gradually add the warm liquid to the flour/yeast mixture, beating until well blended. Increase mixer speed to medium and beat 2 minutes. Add the egg and 1/2 of the remaining flour and beat for 2 more minutes.
4. Using a wooden spoon, stir in enough of the remaining flour to make dough that holds together. Turn out onto a floured surface (use any of the remaining flour) and knead the dough for 8 to 10 minutes until it is soft, smooth, sexy and elastic, keeping the work surface floured and adding extra flour as needed.
5. Place the dough in a lightly greased bowl, turning to coat all sides. Cover the bowl with plastic wrap and a kitchen towel and let rise until double in bulk, 45 – 60 minutes. The rising time will depend on the type of yeast you use.
For the filling
6. Melt the butter and stir in the cocoa powder and the sugar until uniform with no lumps. Set aside.
For the meringue
7. Once the dough has doubled, in a clean mixing bowl – ideally a plastic or metal bowl so the egg whites adhere to the side (they slip on glass) and you don’t end up with liquid remaining in the bottom – beat the egg whites with the salt, first on low speed for 30 seconds, then increase to high and continue beating until foamy and opaque. Add the vanilla then start adding the sugar, a tablespoon at a time as you beat, until very stiff, glossy peaks form.
For the assembly
8. Line a baking/cookie sheet with parchment paper.
9. Punch down the dough. On a lightly floured surface, roll out the dough into a 20 x 10-inch (about 51 x 25 ½ cm) rectangle. Spread the filling and then the meringue over the rectangle up to about 1/2-inch (3/4 cm) from the edges.
10. Now, roll up the dough jellyroll style, from the long side. Pinch the seam closed to seal. Very carefully transfer the filled log to the lined cookie sheet, seam side down. Bring the ends of the log around and seal the ends together, forming a ring, tucking one end into the other and pinching to seal.
11. Using kitchen scissors or a sharp knife (although scissors are easier), make cuts along the outside edge at 1-inch (2 ½ cm) intervals. Make them as shallow or as deep as desired but don’t be afraid to cut deep into the ring.
12. Cover the coffee cake with plastic wrap and allow to rise again for 45 to 60 minutes.
13. Preheat the oven to 350F / 180C.
14. Brush the top of the coffee cakes with the egg wash. Bake in the preheated oven for 25 to 30 minutes until risen and golden brown. The dough should sound hollow when tapped.
15. Remove from the oven and slide the parchment paper off the cookie sheet onto the table. Very gently loosen the coffee cakes from the paper with a large spatula and carefully slide the cake off onto cooling racks. Allow to cool.
16. Just before serving, dust the top of the coffee cakes with confectioner’s sugar and cocoa powder. These are best eaten fresh, the same day or the next day.

Afterthoughts

- First of all, thanks so much to Jamie and Ria for the yummy challenge :-)
- The cake turned out very tasty, a little too big for me, since I cook for only two. So next time I will follow the example of kristy_baker and make two 6-inch cakes with different fillings.
- My dough only rose in the oven, this did not impact the taste, but I had been somewhat concerned until I tasted the cake. So next time I will “activate” the yeast, just like when making bread: I will put the yeast in lukewarm milk with a little bit of sugar and let it rest for 5 minutes, until it becomes bubbly. Then I’ll add the milk with the activated yeast to the flour together with the other liquid ingredients.
- My filling was more liquid than the ones on the Daring Baker’s site, and some of it poured out of the cuts. Based on other posts, it happened to several other bakers. Fortunately there was the parchment paper. Maybe I should use drier filling or make smaller cuts and only on the very top of the cake.

Blog-checking lines: The March 2011 Daring Baker’s Challenge was hosted by Ria of Ria’s Collection and Jamie of Life’s a Feast. Ria and Jamie challenged The Daring Bakers to bake a yeasted Meringue Coffee Cake.

To Recipe...

Tuesday, March 22, 2011

Cream Scones with Clotted Cream

A traditional tea party recipe for a great cause.
Kelly Confidential is hosting a tea party to support the Ovarian Cancer Research. And you can help too. When you go to the Kelly Confidential site before May 17, 2011 and invite a friend, Electrolux will donate $1 to the Ovarian Cancer Research Fund. Plus, you'll be entered for a chance to win an Electrolux Perfect Steam™ washer and dryer.
This week Foodbuzz also pitches in by hosting a Top 9 Takeover for the Ovarian Cancer. All Foodbuzz Featured Publishers were invited to post tea-party inspired recipes, and for each one of these posts Foodbuzz will donate $50 to the to the Ovarian Cancer Research Fund.
Thanks to Electrolux and Foodbuzz for supporting a great cause!
Source
Adapted from one of my favorite blogs, The Joy of Baking.
Taste 5 (out of 5)

Difficulty 1 (out of 5)

Ingredients
For the scones
- 2 cups all-purpose flour (910 cal)
- 1/4 cup light brown sugar, unpacked (135 cal)
- 2 tsp baking powder
- 1/3 cup cold Becel margarine, cut into pieces (520 cal)
- 1 large egg, lightly beaten (70 cal)
- 1 tsp vanilla extract (10 cal)
- 1/2 cup whipping cream (410 cal)
For clotted cream
- 4 oz low fat cream cheese (260 cal)
- 1 cup whipping cream (820 cal)
- 1 tsp vanilla extract (10 cal)
- 1/4 cup white sugar (195 cal)
- lemon zest
Total 3340 cal, 10 2.5 inch scones, 335 cal / scone with clotted cream

Instructions
1. In a large bowl, mix the flour, sugar, baking powder and margarine with a pastry cutter. When the mixture looks like coarse crumbs add the wet ingredients. Stir until just combined, but do not overwork the dough.
2. Knead the dough gently and pat it flat until it’s about 1 inch thick. Cut the scones with a 2.5 inch cookie cutter.
3. Place the scones on a baking sheet lined with a silicon mat or parchment paper, spacing a few inches apart. Brush the tops with some cream, to add some color and shine. Bake in a preheated oven for about 15-20 minutes until nice and golden brown at 375F/190C. A toothpick inserted in the center of a scone should come out clean. Let cool on a wire rack.
4. While the scones cool, whip all the ingredients for the clotted cream until uniform and fluffy (a small blender such as Magic bullet is perfect for this).
5. Serve the scones with the clotted cream and a jam of your choice.

Afterthoughts
- I fell in love with these scones when I was visiting London. They are not your common scone variety sold in coffee shops, they are much softer and creamier (no wonder they’re called cream scones). And the clotted cream is completely to die for.
- I am so thankful to the Joy of Baking blog for showing how easy and fast these scones and the cream can be made at home. I’ve always loved that site and now I love it even more.
- And of course, thanks once again to Kelly Confidential and Foodbuzz for supporting Ovarian Cancer Research!

To Recipe...

Sunday, March 20, 2011

Rose Petal Yogurt Mousse Chocolate Cups

Temper chocolate and make a light yogurt mousse for this delicious, elegant dessert – yes you can!
Source
The mousse adapted from eCurrey blog

Taste 5 (out of 5)

Difficulty 5 (out of 5)

Ingredients
- 1 1/2 cups non-fat yogurt (180 cal)
- 2 tbsp rose petal jam (100 cal)
- Pinch of saffron
- 6 tbsp low fat milk (50 cal)
- 1 tsp unflavored gelatin
- 1 tbsp cold water
- 50 g bitter-sweet chocolate (300 cal)
- 12 blackberries to garnish (20 cal)
Total 6 (or 12, depending on the size), 550 cal, 90 (or 45) cal / serving

Instructions
1. Drain the yogurt. Line a medium sized sieve with a paper towel, place the sieve over a small bowl, scoop the yogurt into the paper towel, wrap the towel around the yogurt and place a heavy object (a can or a jam jar) on top of the towel. Leave the yogurt to drain for about an hour at room temperature. Unwrap the paper towel, you should have about 3/4 cup of a dense (Greek style-like) yogurt.
2. Prepare the gelatin. In a small bowl, take 1 tbsp of cold water, sprinkle 1 tsp of gelatin over it, stir a little and let sit until your chocolate cups are ready and the yogurt is drained.
3. Temper chocolate. Finely chop your chocolate. In a small microwave safe bowl heat 40 g of the chocolate in short intervals of 15-30 seconds (depending on your microwave power). After each segment stir the chocolate and measure the temperature with an instant read thermometer. When the temperature reaches 113F / 45C add the remaining chocolate and stir well until all the chocolate melts and you the mixture is smooth and uniform.
4. Prepare the chocolate cups. I used the Wilton Cordial Cups Candy Mold; this recipe makes about 12 of those. You can use small muffin tins or paper muffin cups instead, but they are probably bigger, and you will likely end up with 6 servings in this case. Use about 1/2 tsp of melted chocolate per candy mold, or 1 tsp per small muffin tin. Pour the chocolate into the mold and then using a brush or a small silicon spatula spread the chocolate over the sides of the mold up to the top. Refrigerate the mold for 5 to 10 minutes until the chocolate is set and firm. At this stage if your chocolate is tempered correctly, it should be easy to unmold the cups by holding the mold about 1 inch or less above the table, flipping and slightly tapping it. If using paper cups, once the chocolate is hard, simply peel the paper off.
5. Place the drained yogurt, saffron and rose petal jam in a blender and whisk it until mixed well. A small blender such as the Magic Bullet is perfect for it. The mixture will be lighter and fluffier than the original yogurt.
6. Heat the milk in the microwave for about 20-30 seconds and pour into the gelatin, stirring well, until there are no lumps left. Add a small amount of yogurt to the gelatin mixture, stir well, and then pour the resulting mixture back into the blender and whisk again. Now you have your rose petal yogurt mousse.
7. Pour the mousse into the cups and let set in refrigerator for about 5-10 minutes. At this stage you can add fruit or candy if you want to decorate the cups with them – the mousse should still be soft but not too liquid and the fruit should not sink. Refrigerate again until the mouse is completely set.

Afterthoughts
- Chocolate and yogurt might seem like a strange combination, but I found it pretty nice – you get a little bitterness from the chocolate, a little sour flavor from the yogurt and sweetness from the rose petal jam. Plus the saffron adds that eastern touch. Of course, other jams would work as well; I bet raspberry or mango would be delicious. And an additional advantage of yogurt (compared to whipping cream) is huge calorie savings :-)
- This recipe is quite time consuming with multiple stages, but if you enjoy trying out new things in the kitchen like I do, it’s just another experiment and adventure.
- Make sure that your molds are completely clean and dry. Chocolate should not come in contact with liquids or fats. Otherwise it will be difficult to unmold. Even if your mold is dry and grease free, unmolding the chocolate can be challenging. If you are having trouble with it, it might be because the walls of your cups are too thin or because your chocolate was not tempered well. But don’t worry and DON’T THROW THE CHOCOLATE! You can always collect the pieces and temper the chocolate again. And you can do it as many times as you like as long as your chocolate does not come in contact with water or grease and is not heated to temperatures over 130F / 55C.
- You don’t have to use the brush; you can also fill the mold with the melted chocolate and gently rotate the mold until the chocolate coats the sides of the mold. If you have excess chocolate, DON’T THROW IT! Pour it onto parchment paper, let it set, peel the parchment paper and keep the chocolate for the next time.
- You don’t need to add all the rose petal jam at once. You can start with half the amount, taste the mousse right before pouring it into the cups and add the remainder based on your sweetness preferences.

To Recipe...

Sunday, March 13, 2011

Baked Kale Fries

Probably the healthiest, lightest fries I can think of
Source
From a vegetarian potluck

Taste 3 (out of 5)

Difficulty 1 (out of 5)

Ingredient
- 1 bunch / 7-8 oz / 200 g kale (100 cal)
- 1 tbsp olive oil (120 cal)
- sea salt to taste
Total: 220 cal, 4 servings, 55 cal / serving

Instructions
1. Wash the kale. Cut the stalks off with the scissors. Tear the leafy part with your hands.
2. Spread the kale on a baking sheet lined with parchment or silicon. Sprinkle olive oil and sea salt over the kale.
3. Bake in an oven preheated to 350F for 10-15 minutes.

Afterthoughts
It is surprisingly crunchy and very light. Definitely much better than what I had expected. But I personally find kale tastier in salads or spreads.

To Recipe...

Spelt Bread

Tasty, simple, healthy and homemade from scratch.
Source
Improvised

Taste 5 (out of 5)

Difficulty
2 (out of 5)

Ingredients

- 2 cups all-purpose flour (900 cal)
- 1 1/2 cups spelt flour (720 cal)
- 3/4 tbsp yeast
- 1 tsp agave syrup or honey (15 cal)
- 1/2 tbsp salt
- 1 1/2 cups lukewarm water (temperature of about 90-100F, a little bit warmer than the body temperature)
Total 1635 cal, 1 loaf, about 15 slices, 110 cal / slice

Instructions
1. In a plastic container (not airtight) or a bowl of about 3/4 to 1 gallon, mix the water and the yeast with the agave syrup or honey. Let stand for about 5-10 minutes to activate the active dry yeast. If you are using instant yeast, you can skip this step and omit the sweetener from the recipe.
2. Add the flours and the salt, mix all the ingredient with a wooden spoon, and then with your hands, until they combine and all the flour is incorporated. There is no need to knead the dough beyond that. Cover the container with a non-airtight lid, or with a plastic wrap and let rest at room temperature for about 2 hours. By that time the dough should be approximately double in size.
3. Now you can either refrigerate the dough and use it within the next week or so, or you can make your bread on the same day. To make the bread, grease a 4’’ x 8’’ loaf pan with cooking oil, non-stick spray or Crisco shortening. With slightly wet hands, collect all the dough from the container, quickly shape it into a loaf shape and place it smoother side up into the pan. Cover the pan with a wet towel (I use a wet paper towel), and let it rise for about 1 to 1 1/2 hours.
4. Half an hour in advance, start preheating the oven to 400F. When the bread has risen and oven is hot, score the top of the bread with a sharp serrated knife, dipped into cold water. Scoring the bread allows the air to escape.
5. Bake the bread for about 50 minutes. Once it’s done, you can remove it from the pan, turn the oven off and leave the loaf directly on the rack in the oven for another 10 minutes, with the oven door slightly open. Then let the bread cool on the wire rack at room temperature.

Afterthoughts

1. It’s a super easy bread to make, with practically no kneading, no special equipment, minimal cleanup (only one container and one loaf pan) and a delicious result. It’s only about 10 minutes of active work, but the whole process takes about 5 hours, from the moment you mix the dough until you can slice you loaf. If you refrigerate the dough after the initial 2 hour rise, you can have the bread ready in 3 hours.
2. This bread has a relatively soft crust, because that’s how my bf likes his bread. But if you prefer crispier crust, bake your bread at a higher temperature (about 450F) for a shorter time (about 40 minutes). You can also place a broiler tray on the lower oven rack. Leave it in the oven while it preheats, and when you put the loaf into the oven, pour a cup of hot (not boiling water) into the hot broiler tray, and immediately close the oven. This will generate steam that will help form the crispier crust.

To Recipe...

Wednesday, March 9, 2011

Coleslaw, Sweet Coleslaw

What better way to taste your julienne and chiffonade knife skills.
Source
Inspired by a knife skills class by Mark Halyk of Catered Art

Taste 5 (out of 5)

Difficulty 3 (out of 5) – depending on your knife proficiency ;-0

Ingredients
- 1/2 medium sized green cabbage head (110 cal)
- 1 medium carrot (25 cal)
- 1 medium apple (80 cal)
- 1/4 medium jicama (50 cal)
- 1/2 large red bell pepper (20 cal)
- 1/3 cup dried cranberries (140 cal)
- 2 green onions (5 cal)
- 2 garlic cloves (10 cal)
- 1 orange (90 cal)
- 1 grapefruit (90 cal)
- 5-6 sprigs of fresh mint
- 1 tbsp raspberry vinegar (10 cal)
- 2 tbsp olive oil (240 cal)
- zest of 1 orange and 1 grapefruit
- nutmeg, salt and black pepper to taste
Total: 870 cal, 6 servings, 145 cal/serving

Instructions
Normally I would say: “thinly slice all the vegetables and mix”. But after having learned the techniques I feel like I have to use the right terminology (at least once), to make it sound more complicated and professional :-)
1. Chiffonade the cabbage and the mint.
Chiffonade is a way of cutting leafy vegetables into thin strips. If you are working with mint (or basil, or other thin leaves), place 5 to 10 leaves on top of each other and roll them into a tight “cigar”. Then slide a very sharp chef’s knife across the cigar cutting it into very thin strips. Try to glide the knife, as opposed to pushing it hard into the mint; otherwise the mint will get “bruised,” i.e., will oxidize and darken quickly. Since cabbage leaves are already rolled tightly together by default, all you need is just to cut the cabbage head into quarters, remove the hard core and thinly slice the quarters across the grain.
2. Julienne the carrot, the apple, the jicama and the pepper.
Julienne cut creates very thin, long strips, similar to matchsticks (about 1/8 x 1/8 x 2.5 inches). Peel the carrots and the jicama, leave the apple skin on. Trim the ends of the carrot and cut it into 2-3 parts crosswise. Cut each segment in half lengthwise and lay the cut side down on the table, this way it’s stable. Cut the carrot into 1/8’’ thick slices, and then cut these slices into 1/8’’ thick long strips. Quarter the jicama (you only need a quarter) and cut into strips similarly to the carrot. Core and quarter the apple and julienne just like the jicama. The pepper is the easiest to julienne, just cut it in half, remove the seeds and cut into thin strips.
3. Place the green onions on a clean cutting board and rock your knife across them, cutting them in thin strips (size-wise similar to the mint chiffonade).
4. Place the garlic cloves onto a clean cutting board, place the flat side of your chef’s knife on top of them with a blade facing away from you, press with a palm on the upper side of the blade (be careful so that your hand does not slide) until the garlic cracks. At this point the garlic is extremely easy to peel. The cut for the garlic is the fine brunoise – a 1/16 x 1/16 x 1/16 inch dice. First cut the garlic into very thin sticks (similar to julienning the carrots) and then cut across the sticks to create the dice.
5. Zest and peel the orange and the grapefruit and cut off the segments.
While the orange is still whole, zest it with orange zester and sprinkle the zest over the salad. Then cut both ends off the orange to expose the flesh. Place the orange the cut side down. Peel with a sharp knife from top to bottom, tracing the shape of the orange. Remove all the zest, the outer colorful part, and the pith, the white inner portion of the peel, but try to leave the flash intact. Cut along the membranes to release the sections. Squeeze the membranes with the remaining flash over the coleslaw to add orange juice to the salad. Repeat the same procedure with the grapefruit.
Tip: Citrus juice is not only tasty, it also prevents oxidation in apples, so they don’t turn brown.
6. Now mix all the vegetables in a large bowl, sprinkle with dried cranberries and citrus sections. Whisk together the vinegar with the olive oil; add nutmeg, salt and black pepper to taste and pour over the coleslaw.
7. It’s better to let your coleslaw stand in the refrigerator for at least an hour, or better, overnight, before serving. Enjoy!

Afterthoughts
- I think this coleslaw will taste just as good without any special knife skills, but I find it fun playing with the tools in the kitchen, and practicing knife skills trying to imitate those fancy chefs on the Foodnetwork.
- I love adding citrus juice and zest to any dishes: salads, meat, fish, cakes. It adds a lot of flavor and vitamin C.
- I really enjoyed the knife skills class. It is very useful to have someone knowledgeable look at your cutting techniques and give you feedback for improvement. But if you don’t have a similar class in your area, there are very good informative videos on Youtube and other sites. Just google “knife skills” and you’ll see.
- And be very careful with sharp knifes - goes without saying, but I’ll say it anyway ;-)

To Recipe...

Monday, March 7, 2011

Frosted Fruit Cake with Longan Curd

The spring is just starting but if you already miss the frost, bring it back with this light, fruity frosted cake.
Source
Angel-like cake - improvised
Curd, meringue and design inspired by “Celebration Cakes” by the Australian Women’s Weekly Magazine.

Taste 5 (out of 5)

Difficulty 4 (out of 5)

Ingredients
For the cake (915 cal)
- 1/3 cup all-purpose flour (150 cal)
- 1/2 tsp baking powder
- 1/4 cup margarine or butter (405 cal)
- 1/3 cup sugar (255 cal)
- 1 egg (70 cal)
- 1/4 cup milk (30 cal)
- 1/2 tsp vanilla extract (5 cal)
- pinch of cream of tartar
For the longan curd (485 cal)
- 150 g canned longans in syrup (130 cal)
- 2 eggs (140 cal)
- 1 tsp finely grated lemon zest
- 30 g butter (215 cal)
Meringue (220 cal)
- 2 egg whites (30 cal)
- 1/4 cup sugar (190 cal)
Fruit (220 cal)
- 1 cup seedless grapes (100 cal)
- 3 small mandarins (120 cal)
- 1 egg white for brushing
- 1/4 cup confectioners’ / icing sugar for dusting
Total 1840 cal, one 6 inch / 15 cm cake, 6 servings, 305 cal/serving

Instructions
For the cake
1. Separate the egg white from the yolk. Beat the egg white with the cream of tartar until soft peaks form. Add 2-3 tablespoons of sugar and whisk to stiff peaks.
2. Mix the remaining ingredients (including the egg yolk) until uniform. Add 1/4 of the egg whites to lighten the mixture and then fold in the remaining egg whites.
3. Grease a 6 inch cake pan, pour the cake mix and bake at 350F for about 30-40 minutes or until a toothpick inserted into the middle of the cake comes out smooth.
4. Let the cake cool in the pan for about 5 minutes, and then remove it from the pan and let cool completely on a rack. Split the cake in half.
For the longan curd
5. Puree the longans in a blender. Combine all the ingredients in medium heat proof bowl over simmering water and stir until the mixture thickens enough to coat a wooden spoon. Cover and cool the curd and refrigerate until ready to use.
For the meringue
6. Beat the egg whites until they form soft peaks. Add the sugar and cream of tartar and continue whisking until firm peaks.
For assembly
7. Place the lower half of the cake on a baking sheet. Spread half of the curd on top. Reserve several mandarin segments and grapes for decoration. Arrange the remaining fruit over the curd. Spread the remaining curd on top of the fruit and cover with the upper half of the cake.
8. Spread the meringue all over the cake, and bake at 350F for 3-5 minutes until meringue is lightly brown.
9. Brush the remaining fruit individually in egg whites and dip in the icing sugar. Place the frosted fruit on a tray lined with parchment paper. Leave for about an hour to dry.
10. Arrange the frosted fruit on the cake.

Afterthoughts
- The base cake is absolutely wonderful. Just a little hassle to make, because you need to whisk the egg whites. And for this cake you also need to make the meringue, so you’re whisking twice. But maybe you can whisk all the egg whites at once, and use part for the cake and part for the frosting. I wonder if you can keep the whisked unbaked egg whites for the meringue for 1-2 hours outside, that’s probably as long as it will take to bake, chill and assemble the cake.
- The curd was not “optimal” – the liquids separated and I had to drain them. So far, I have never had luck with whisking the eggs over a double broiler. But when I warm the rest of the ingredients and then add them slowly to the egg mixture, it tempers the eggs perfectly. That’s what I’ll do next time. After draining, the curd tasted really good, though. And maybe the extra liquid served to moisten the cake a bit more, so overall, the cake tasted great.
- The meringue is extremely sticky, so it is very challenging to transfer the coated cake to another dish. It’s best if you can serve it on the same dish you used to bake it. Also, you might try dipping your knife in cold water before cutting the cake, to prevent it from sticking and tearing the meringue apart.

To Recipe...

Friday, March 4, 2011

Bird’s Milk Cake

In Slavic fairy tales princesses used to send their suitors to bring them an amazing delicacy that no one had ever tasted before: the Bird’s milk - Ptasie mleczko (Polish), Ptichye Moloko (Russian: птичье молоко), ptashyne moloko (Ukrainian: птaшине молоко).
Here’s one for you :-)
Source
Bird’s milk soufflé - not available in English
Cake and modeling chocolate drape from “Celebration Cakes” by the Australian Women’s Weekly Magazine.

Taste 4 (out of 5)

Difficulty 5 (out of 5)

Ingredients
For the cake (1105 cal)
- 60 g margarine or butter (430 cal)
- 1/2 tsp vanilla essence (5 cal)
- 1/3 cup / 60g sugar (230 cal)
- 1 egg (70 cal)
- 3/4 cups all-purpose flour (340 cal)
- 1/2 tsp baking powder (mixed with 1 tsp apple cider)
- 1/4 cup / 60 ml milk (30 cal)
Fort the Bird’s milk soufflé (735 cal)
- 2 eggs (140 cal)
- 1/3 cup / 60 g sugar (230 cal)
- 40 g margarine or butter (290 cal)
- 3 tbsp / 40 ml milk (20 cal)
- 6 g gelatin
- 30 ml water
- 1 tbsp all-purpose flour (55 cal)
For the modeling chocolate (730 cal)
- 100 g dark chocolate (600 cal)
- 2 tbsp light corn syrup (130 cal)
Total: one 6-inch / 15 cm cake, 2570 cal, 6 servings, 430 cal / serving

Instructions
For the cake
1. Preheat oven to 350F and grease a 6 inch / 15 cm cake pan. If you don’t have a small cake pan, you can use a small oven-safe sauce pan of this size (make sure it does not have plastic parts that would melt in the oven). If you are using a sauce pan, line its bottom and sides with greased parchment paper to prevent the cake from sticking to the pan.
2. Mix all ingredients until uniform and pour into the pan.
3. Bake for about 40 minutes or until a toothpick inserted into the middle of the cake comes out smooth.
4. Let the cake cool in the pan for about 10 minutes, then remove from the pan and let cool on a rack.
5. When the cake has fully cooled down, level the domed crown of the cake with a sharp knife, so that the top of the cake is flat. See a cool, simple leveling / “torting” technique here.
For the bird’s milk soufflé
1. Cover gelatin with 30 ml cold water and let rest for an hour.
2. Separate egg whites from egg yolks. Mix the yolks with 30 g sugar. Add the milk and mix in. Add the flour and mix well. Place the resulting mix in a heat proof bowl on top of a pot of simmering water (double broiler) and heat until thickens. Cool slightly and beat in the softened margarine. Heat the gelatin until all the grains melt and let cool.
3. Whisk the egg whites with a pinch of salt until fluffy. Add the remaining 30 g of sugar and beat until soft peaks. Whisk in the gelatin. Whisk in the egg yolk mix.
4. Place the leveled cake at the bottom of a 6 inch spring form cake pan lined with parchment paper on the sides. Pour the soufflé mixture on top and refrigerate for at least an hour or until the soufflé stiffens.
If you don’t have a spring-form pan, you can wait 10-15 minutes until the soufflé hardens a little bit, and pipe the soufflé over the base. In this case, keep an eye on the soufflé, as it may solidify very quickly.
5. Once the soufflé is stiff, release the cake from the spring form pan.
For the modeling chocolate drape
1. Melt chocolate in a medium-sized double broiler –a bowl placed over simmering (not boiling) water.
2. Add the corn syrup and stir until the mixture thickens. It might become slightly grainy. Cover the bowl with plastic wrap and let it stand at room temperature for 2-3 hours until it is firm enough to work with.
3. Once firm, knead the modeling chocolate until smooth and then roll between two sheets of plastic wrap until large enough to cover the top and the sides of the cake. Remove the upper plastic wrap sheet. Carry the chocolate on the lower sheet until it is above the cake. Carefully turn the sheet over and drape the chocolate over the cake. Once the chocolate drape is placed the way you like it, release the plastic wrap. Dust the cake with sifted cocoa.
You can use the remaining chocolate to molding flowers, leaves, birds or other decorations. If refrigerated, the chocolate becomes very stiff. But you can microwave it for 20-30 seconds (check it, you might need to rotate it) until it’s pliable again.

Afterthoughts
- My favorite part is the soufflé. You can also add a little lemon or orange zest and / or extract.
- The butter cake turned a little too dry. Maybe I over-baked it.
- The modeling chocolate drape is pretty cool and very pliable – if you mess things up, you can just reroll and reshape it. But once draped or shaped, it becomes a little too hard to be comfortably eaten. A simple chocolate glaze (chocolate and butter or whipping cream) would have a much nicer texture to go with such cake.
- Check out the Wikipedia article on Bird’s milk here.

To Recipe...